Everything, step by step
From the first run to the customer display and the tax authority. Pick a topic from the list, or read it top to bottom in about twenty minutes.

1Install & first run
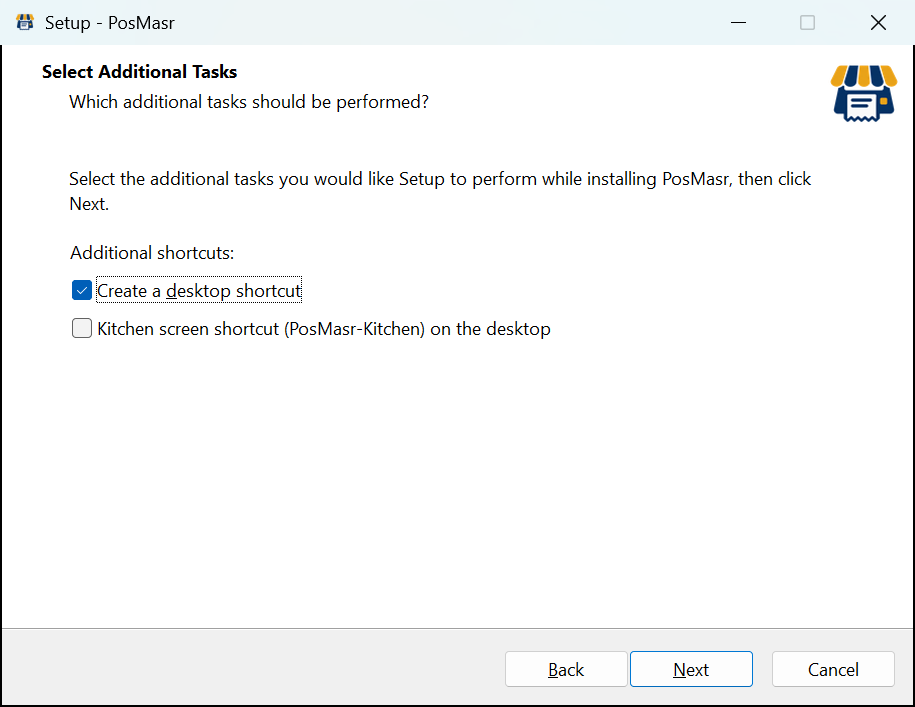
- Run PosMasr-Setup.exe: Next, Next, Finish. It installs the program under Program Files, adds a desktop and Start-menu shortcut (and a kitchen-screen shortcut if you tick it), and opens it.
- The program opens full screen. Your products, sales and settings live in
C:\ProgramData\PosMasr\data, and no update or uninstall ever removes them.
- Go to Settings → Products and set your prices.
- Then Printer & receipt (pick the printer and paper width) and Tests → Test print.
2Login & accounts (cashiers)
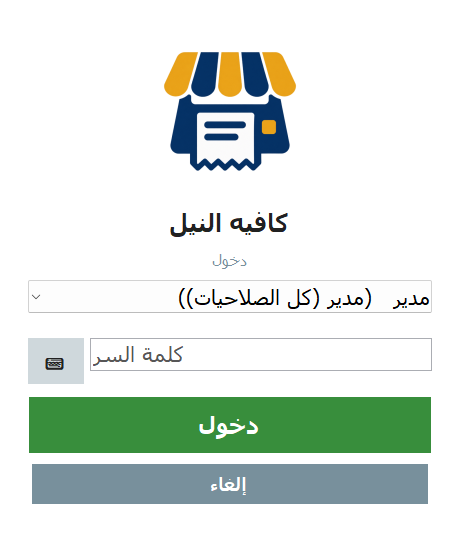
On first run the program asks you to create the manager account (name + password) — it has every permission. After that, each start shows the login screen: pick the user, type the password, press Login.
- Manager: everything (sell, reports, inventory, credit, products, settings, exit).
- Cashier: selling only. The management buttons are hidden.
- Add a cashier: Settings → Users → Add user. Change passwords or disable accounts there too.
- Switch cashier (top bar) opens the login screen to hand over the shift without closing the program.
- Every receipt records the cashier; reports can be filtered by cashier.
3Selling
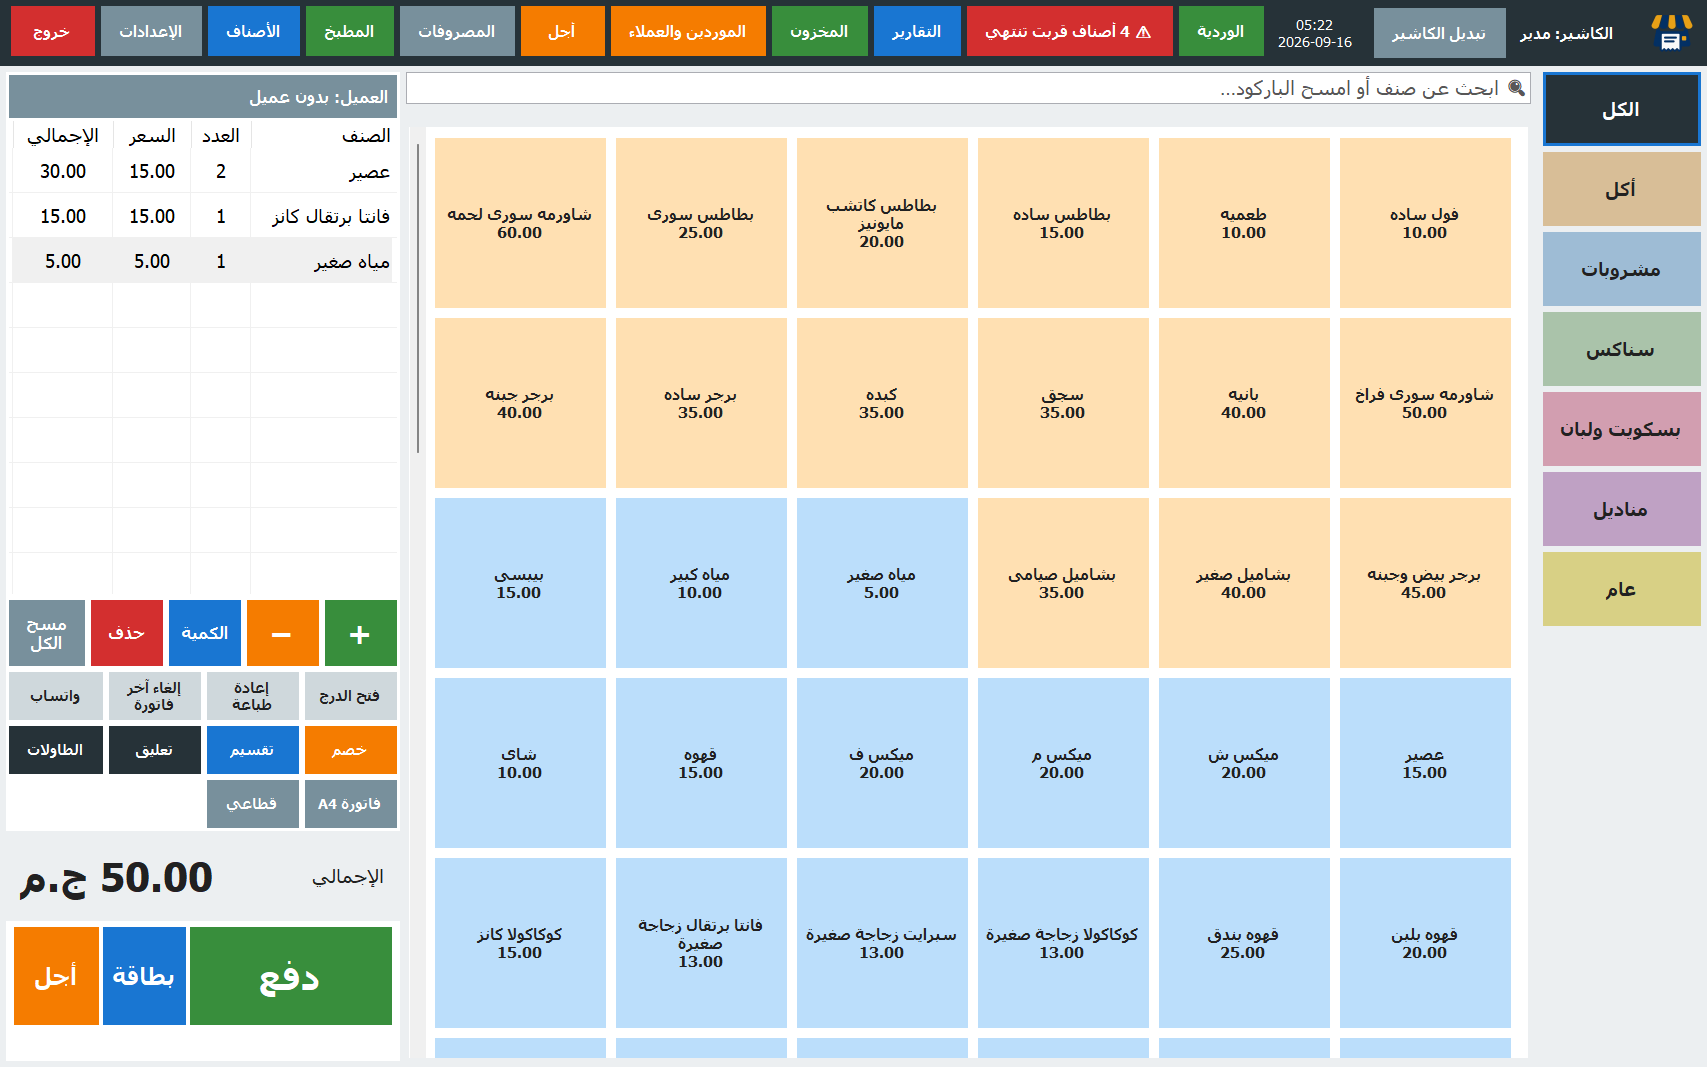
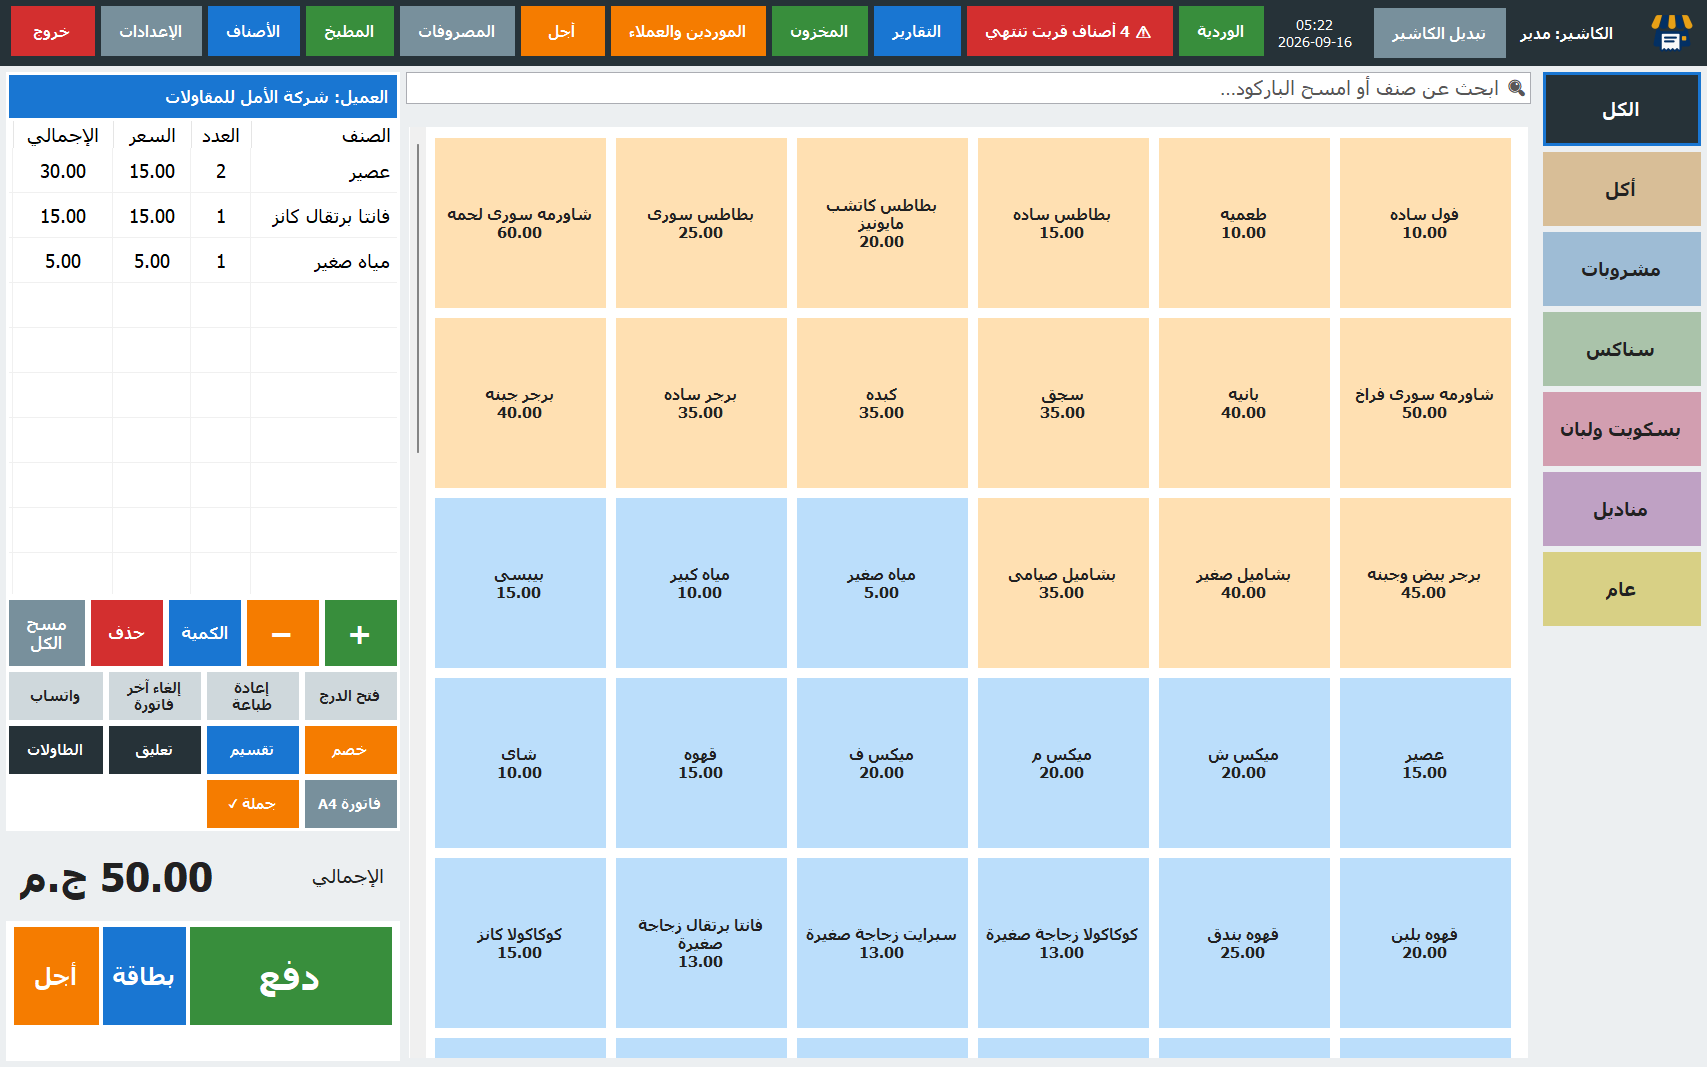
- Categories on the side. Tap one to show only its products.
- Tap a product to add it to the receipt. Tap again to add one more.
- Select a line, then + / − change the quantity, Remove deletes it, Clear starts a new receipt.
- Open drawer, Reprint last, Void last receipt sit under the receipt.
- Search / barcode box above the products: type part of a name to filter, or scan a barcode to add the item directly. The box is always ready for the scanner.
- Products with tracked stock show the remaining quantity in brackets; sold-out ones look faded (or hidden, if you enable that in Settings).
4Payment: cash, card, credit
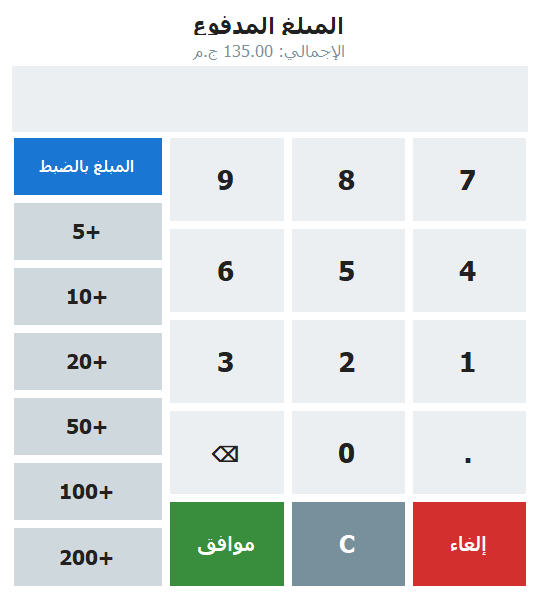
Cash
- Press Pay.
- Type the amount received, or use the quick buttons (+50, +100… they add up), or Exact if the customer paid the total.
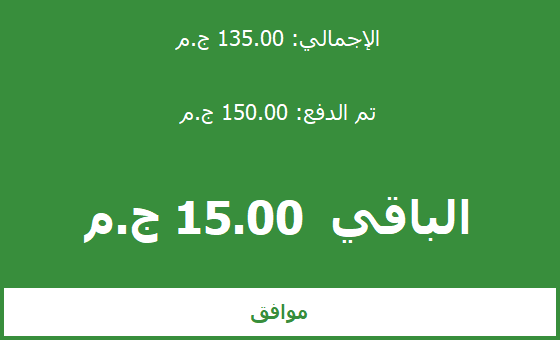
- Press OK: the receipt is saved, printed (if enabled), the drawer opens, and the change shows in big digits.
Card
- Take the payment on the card terminal first and make sure it's approved.
- Press Card and confirm the amount. The sale is recorded as paid by card (no change, no drawer) and the receipt says “Payment: Card”.
Credit
- Press Credit after choosing the items.
- Pick an existing customer or type a new name (and phone). OK.
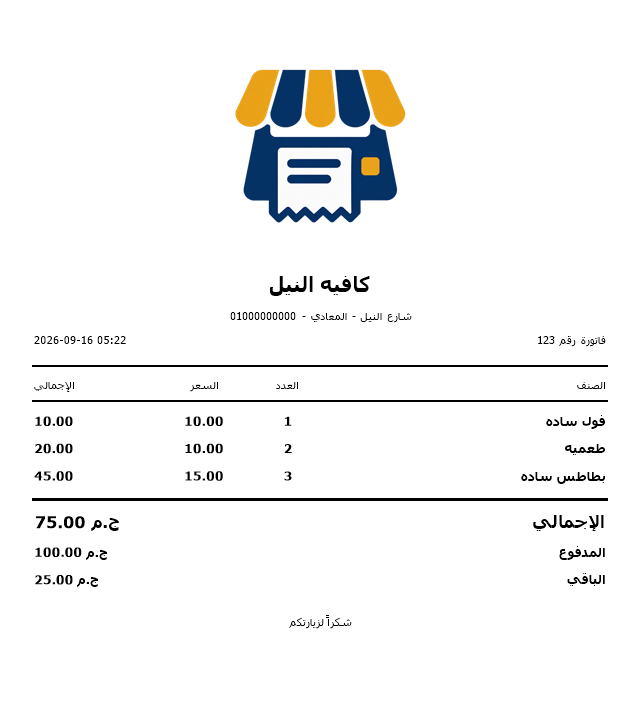
- The receipt is saved on the customer's account and printed with their name and balance.
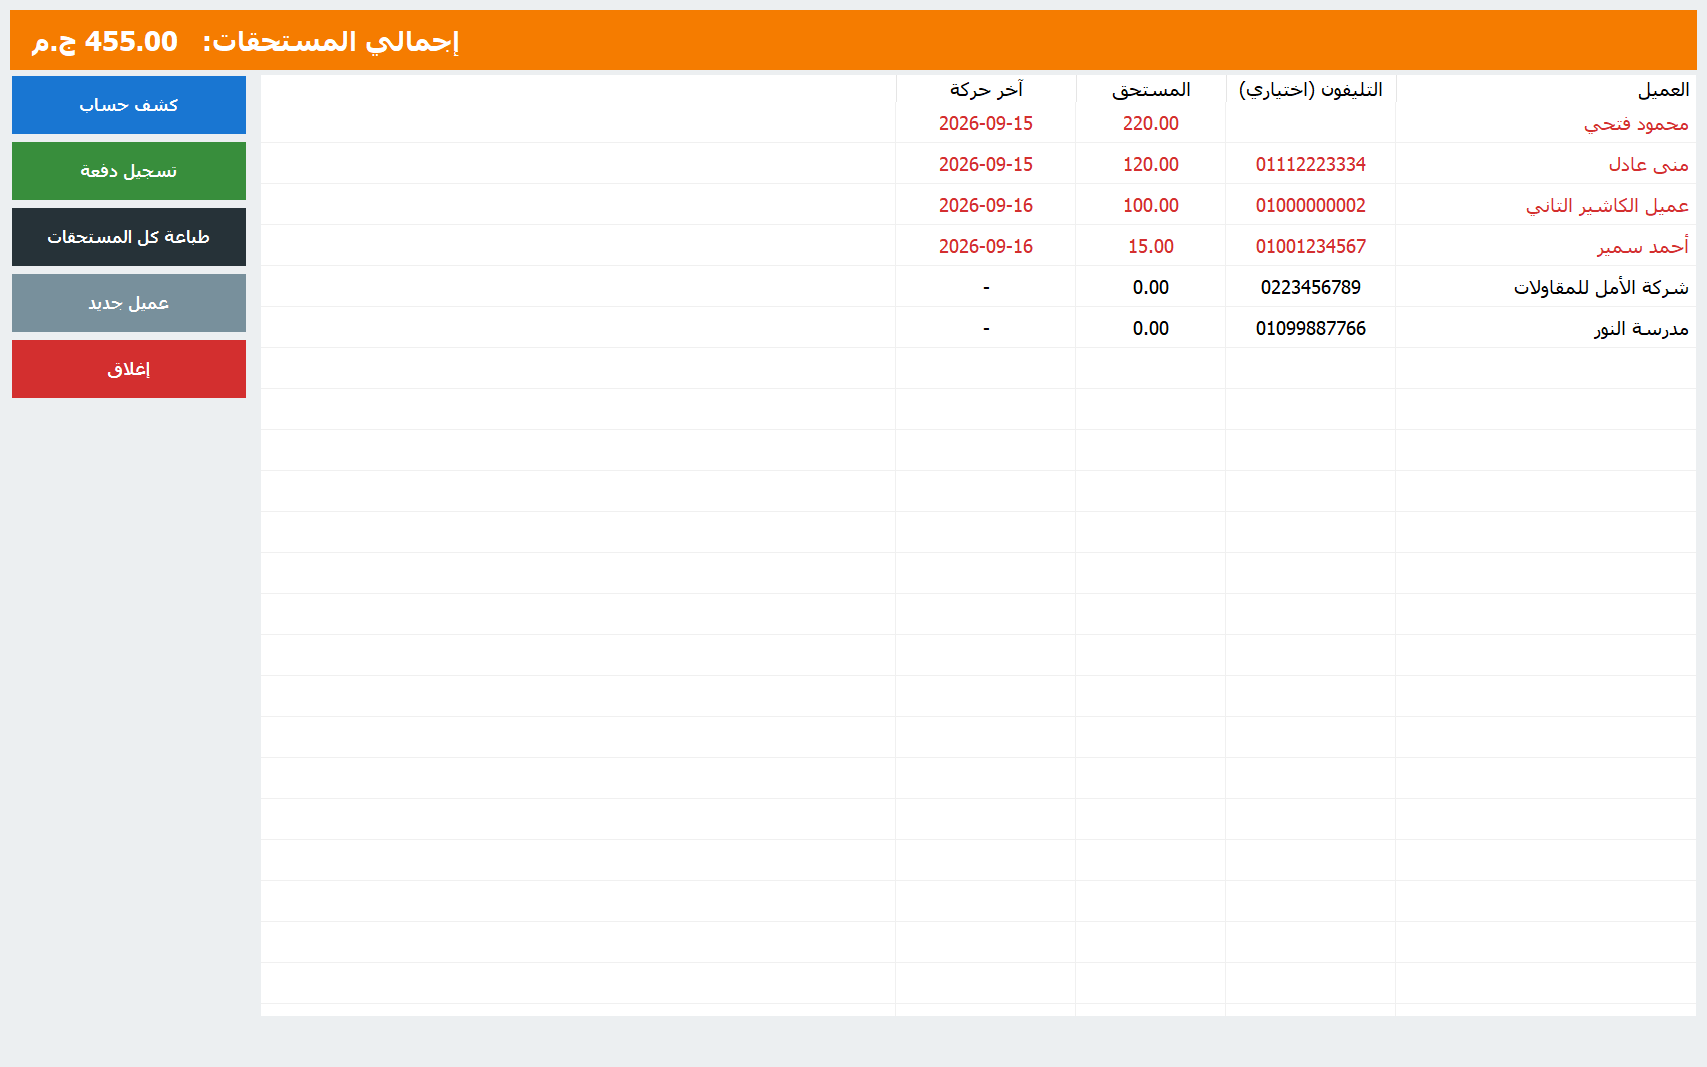
The Credit button in the top bar opens the who-owes screen: every customer and their balance, Statement (all their receipts and payments, printable), Record payment when they pay back, and Print all balances for a paper copy.
5Printer & receipt
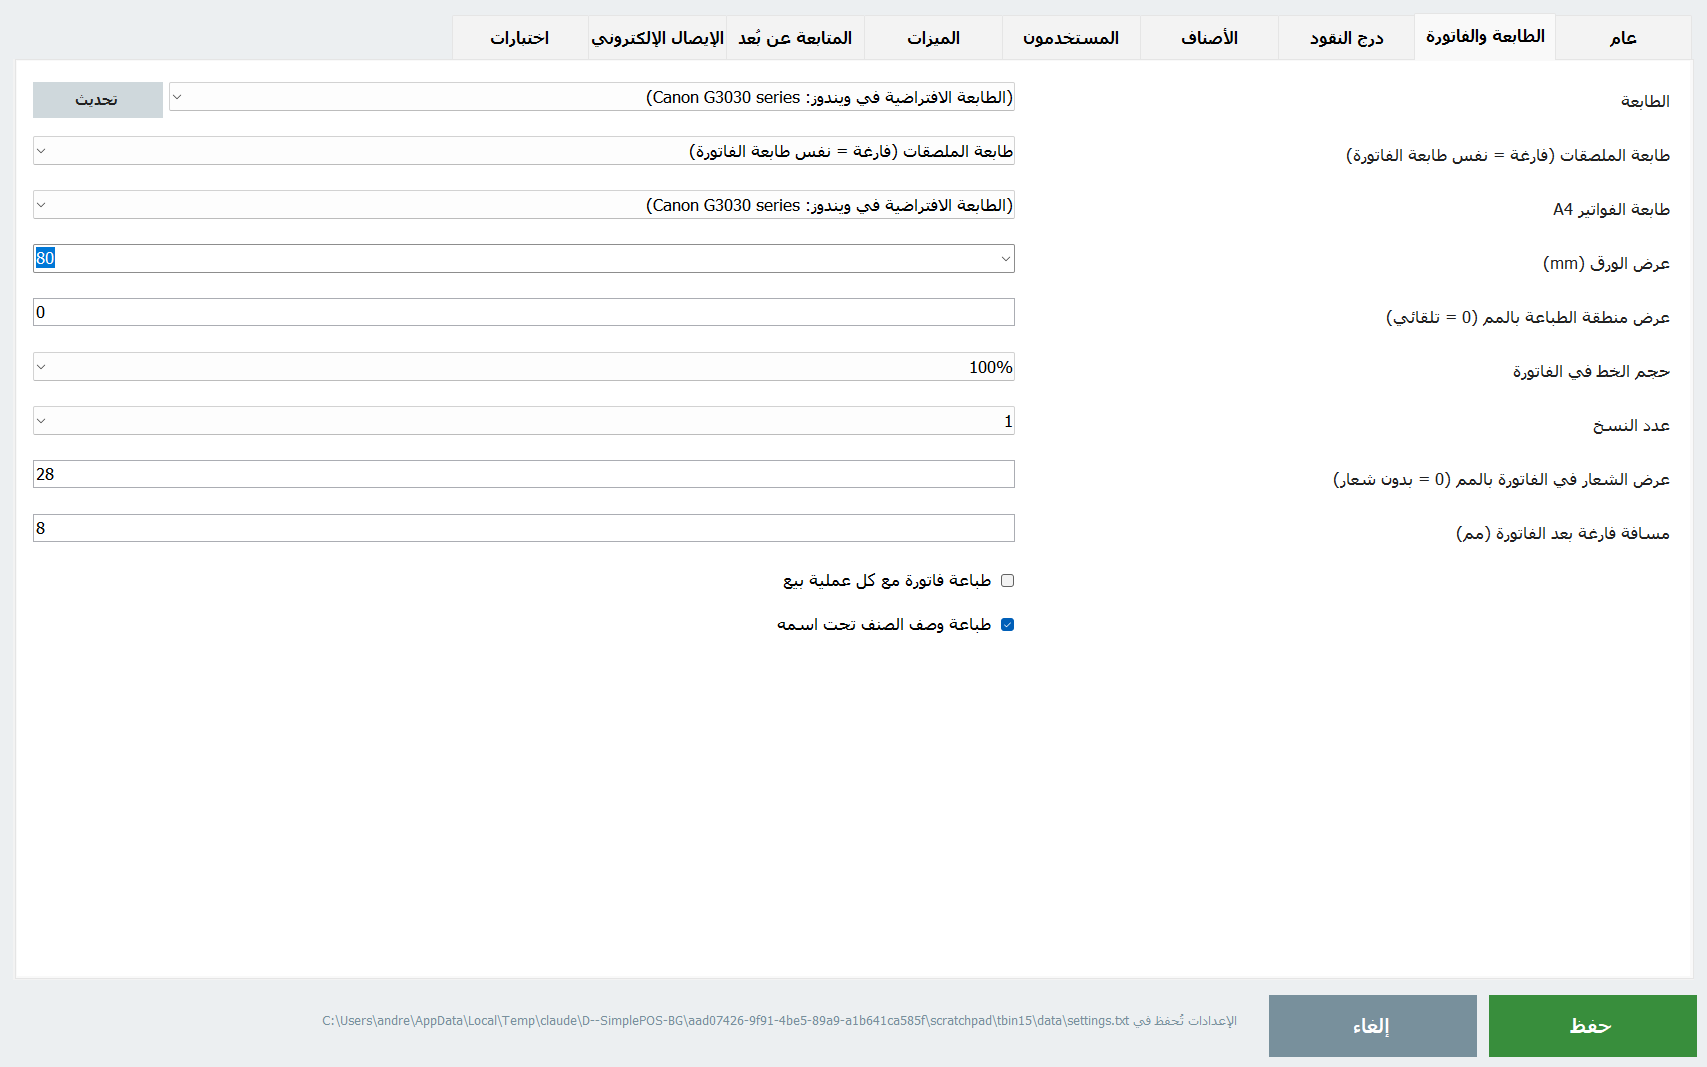
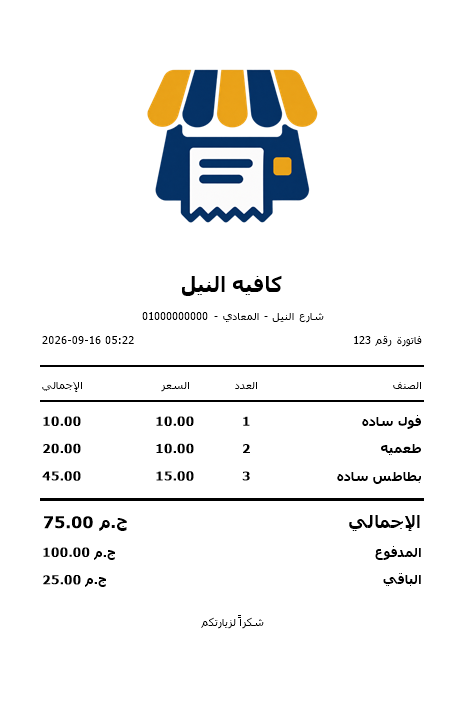
- Printer: choose the thermal printer; “Default” uses the Windows default printer.
- Paper width: 80 mm (most common) or 58 mm. Leave printable width at 0 for automatic.
- Font size: 100% normal; try 110–125% if it prints small.
- Logo width in mm at the top of the receipt (0 = none).
- Print on every sale: enable after the test print works.
- Shop name, address/phone line and the thank-you footer are in the General tab.
6Cash drawer
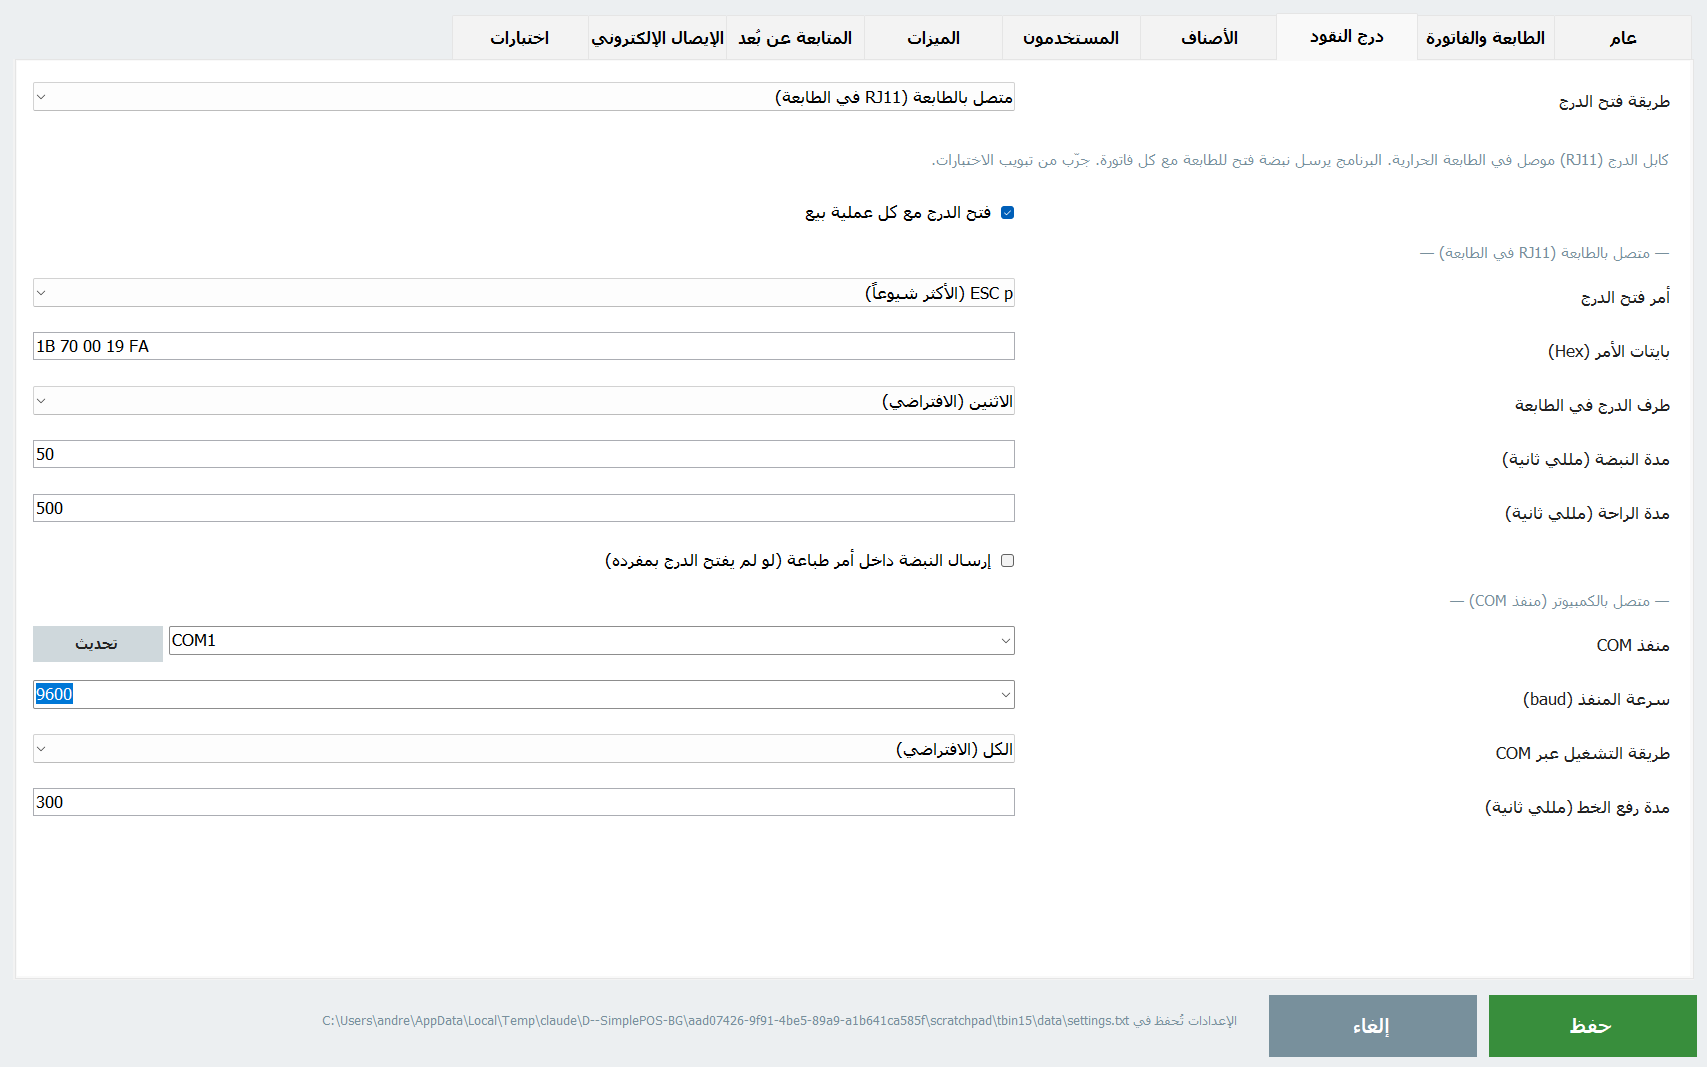
- Connected to a network printer (IP) (3.0) — the printer is on the LAN or Wi-Fi and the drawer hangs off its RJ11 port: enter the printer's IP and port 9100 and the pulse goes straight to the printer, bypassing the Windows driver.
- Drawer won't open? Tests → Diagnose drawer now tries every command with 50 / 120 / 250 ms pulses (3.0). If none works: print the raw ESC/POS test first — if the slip prints, commands reach the printer and the fault is the RJ11 cable, the socket (drawer port, not the phone jack) or the drawer voltage (12V vs 24V); if the slip does not print, the Windows driver swallows raw commands — enable the driver's own “Cash drawer: open before printing” option or use the Generic / Text Only driver.
- Connected to the printer — the usual setup: the drawer's RJ11 cable goes into the printer's drawer port. Leave the pin on “both”. In this mode COM ports are irrelevant.
- Kick command: most printers work with ESC p (default). If not, try DLE DC4, BEL, or a custom hex from your printer's manual.
- Send the pulse inside a print job: some printers need this.
- Connected to the PC: only if the drawer uses a USB/serial trigger. Pick the port, or press Detect drawer port in Tests.
- “Open drawer on every sale” opens it automatically when you confirm a cash payment.
7Barcodes & label printing
- Give each product a barcode in the product editor: type it or scan it into the field.
- On the sales screen, scanning adds the product; scanning again adds one more.
- In Inventory, scanning adds one unit to stock (receiving).
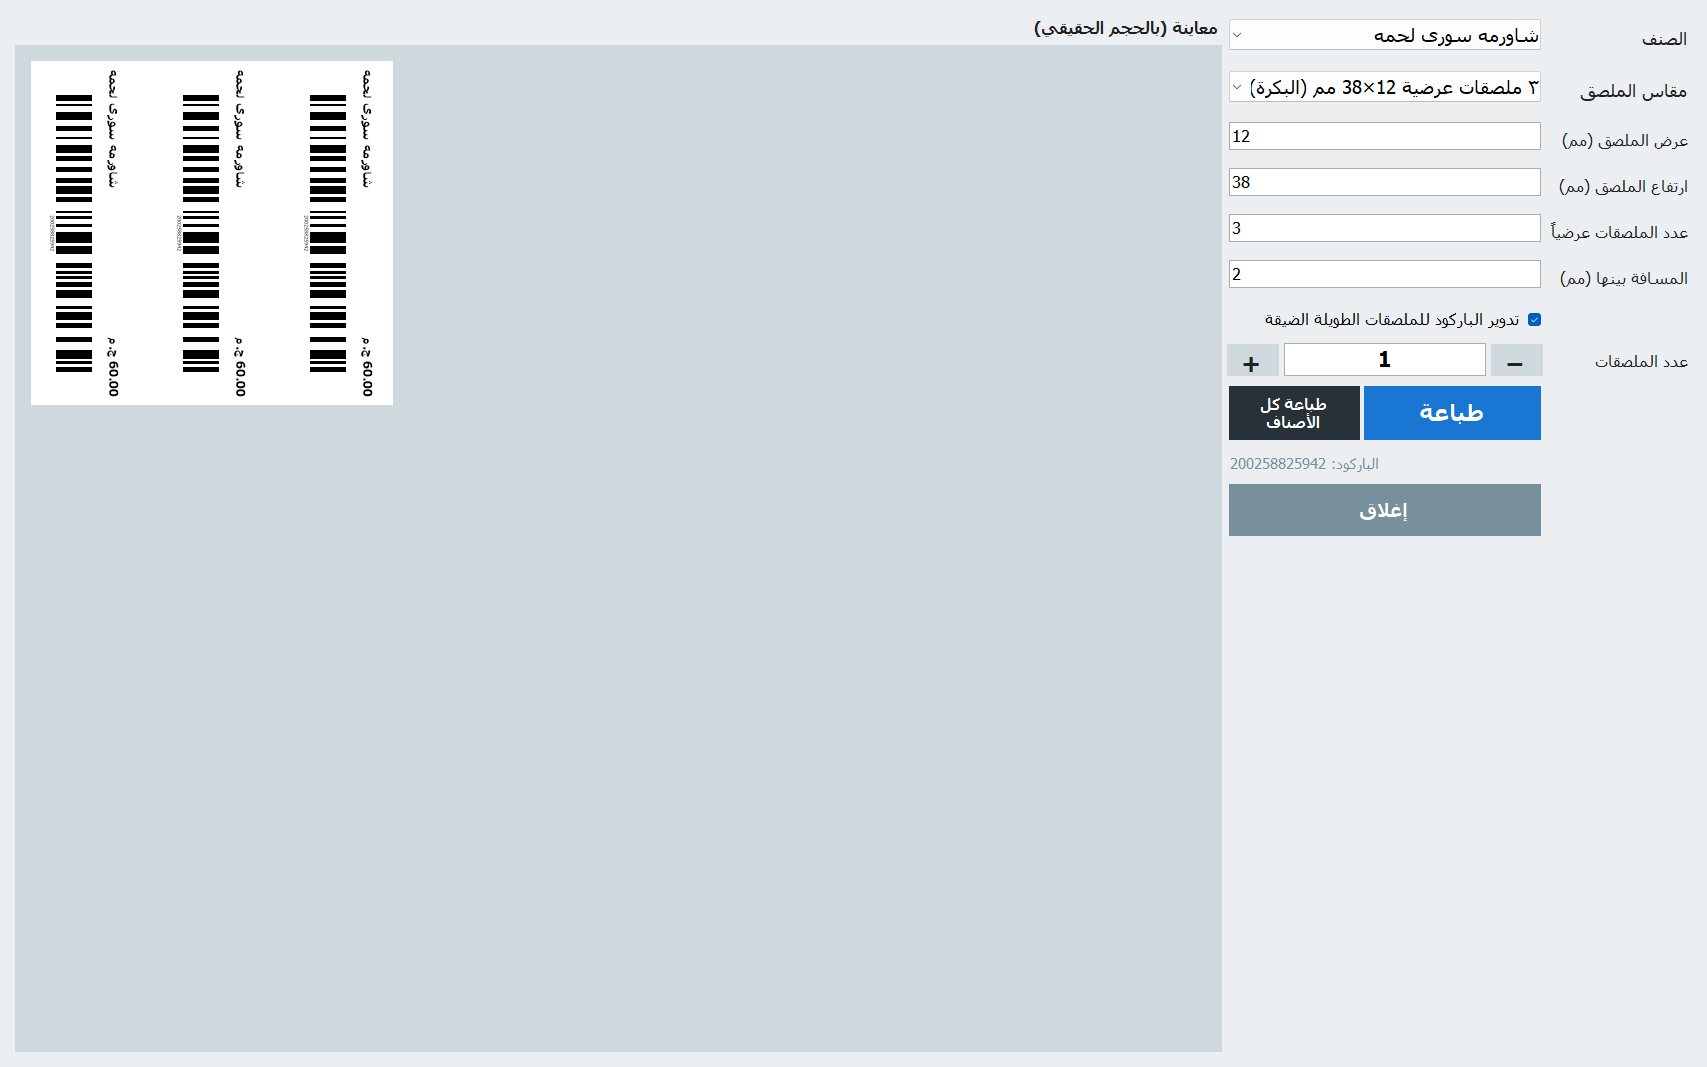
From Inventory select a product and press Print label:
- Choose the product, the label size and the number of copies; a real-size preview appears.
- Presets: 3-across 12×38 mm roll (rotated barcode), pharmacy split label, and singles (40×25, 50×30, 30×20, 60×40…). Or set width/height/columns/gap yourself.
- Each label prints the name, price and a scannable Code 128 barcode. Products without a barcode get one generated and saved.
- Print all products prints a label for every product at once. A dedicated label printer can be set in Settings → Printer.
8Inventory & profit
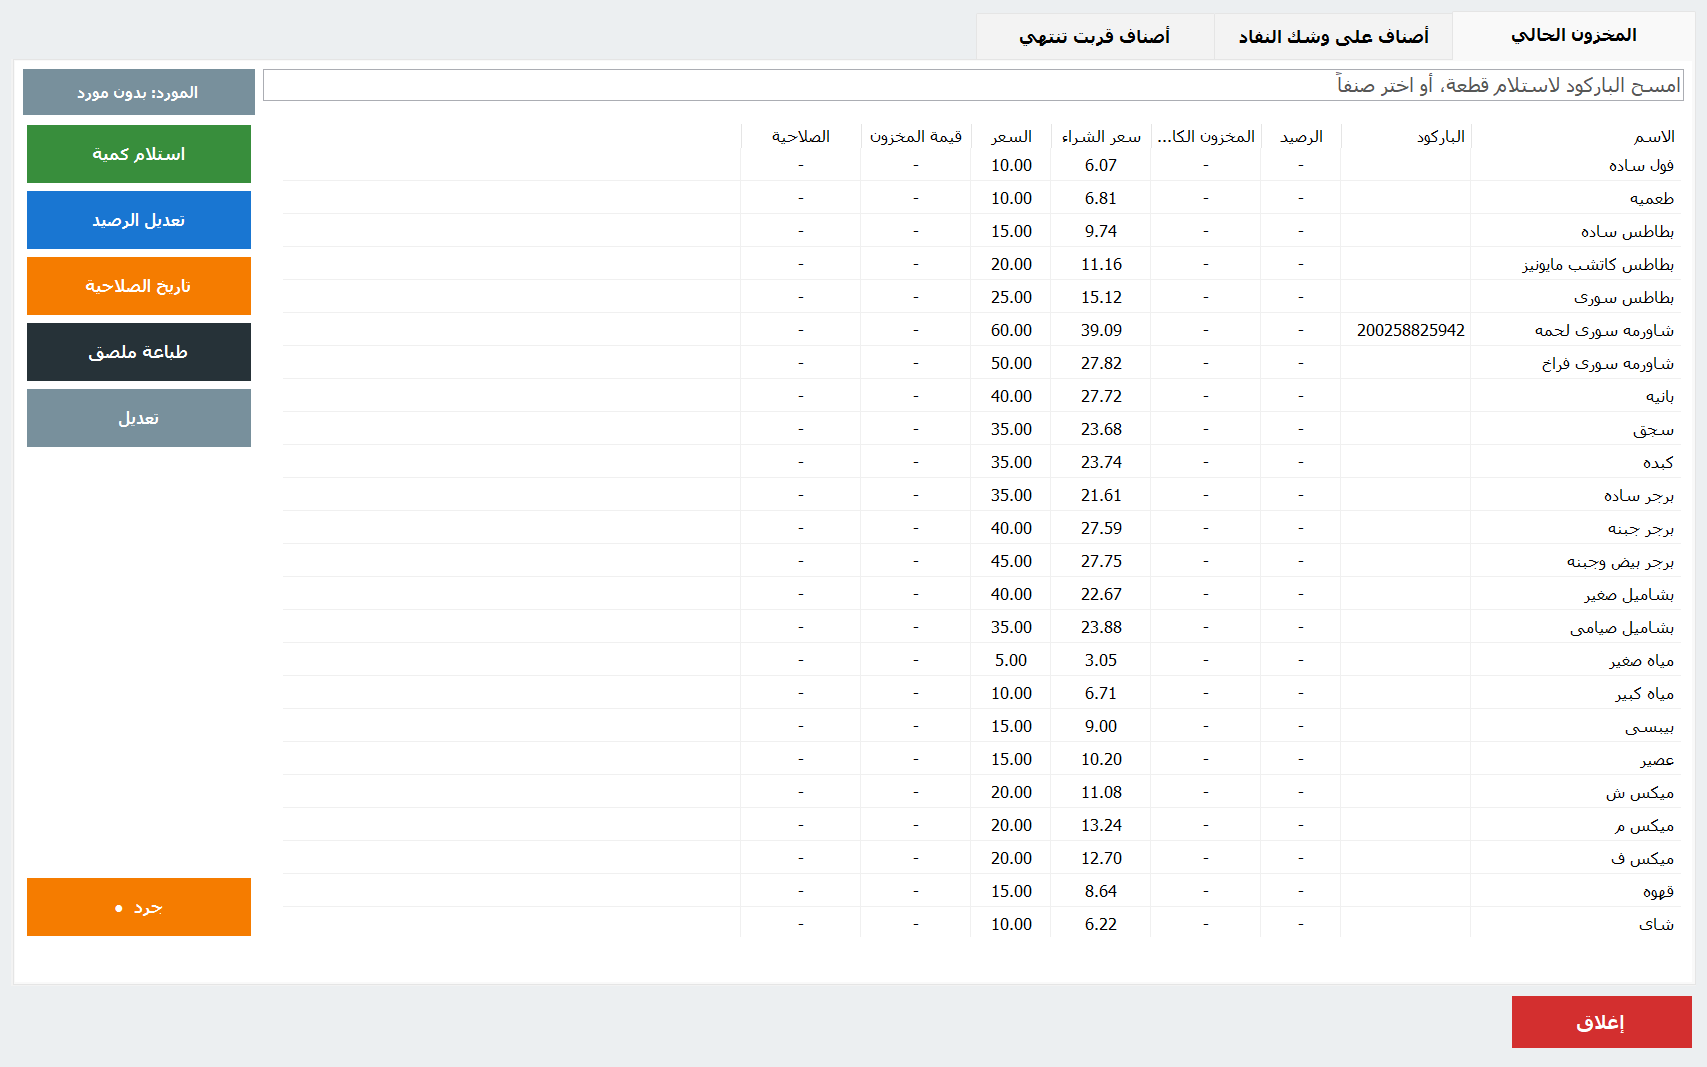
- Current stock: every product with barcode, stock, full-stock level, cost, price and stock value. Low = orange, out = red. Type to search, or scan to receive one unit. Buttons: Receive quantity, Adjust stock, Edit.
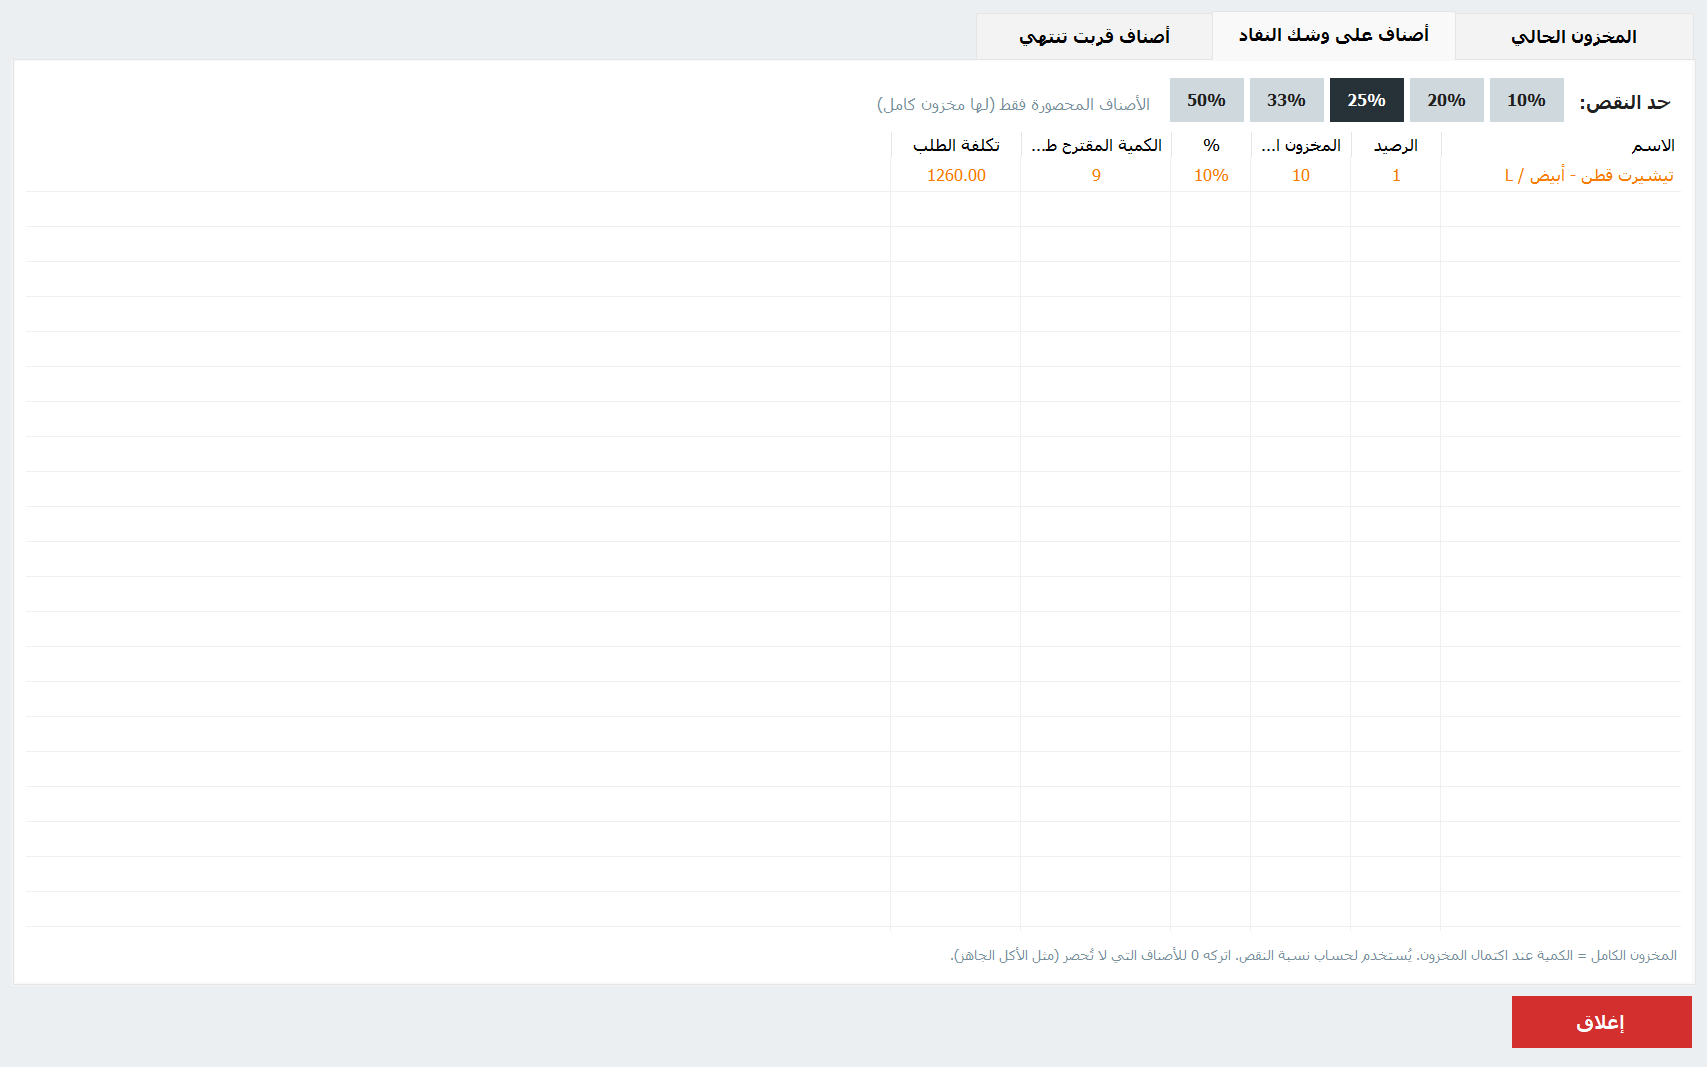
- Running low: what to reorder before it runs out, with a threshold of 10–50%. Shows current stock, full stock, %, suggested quantity and its cost.
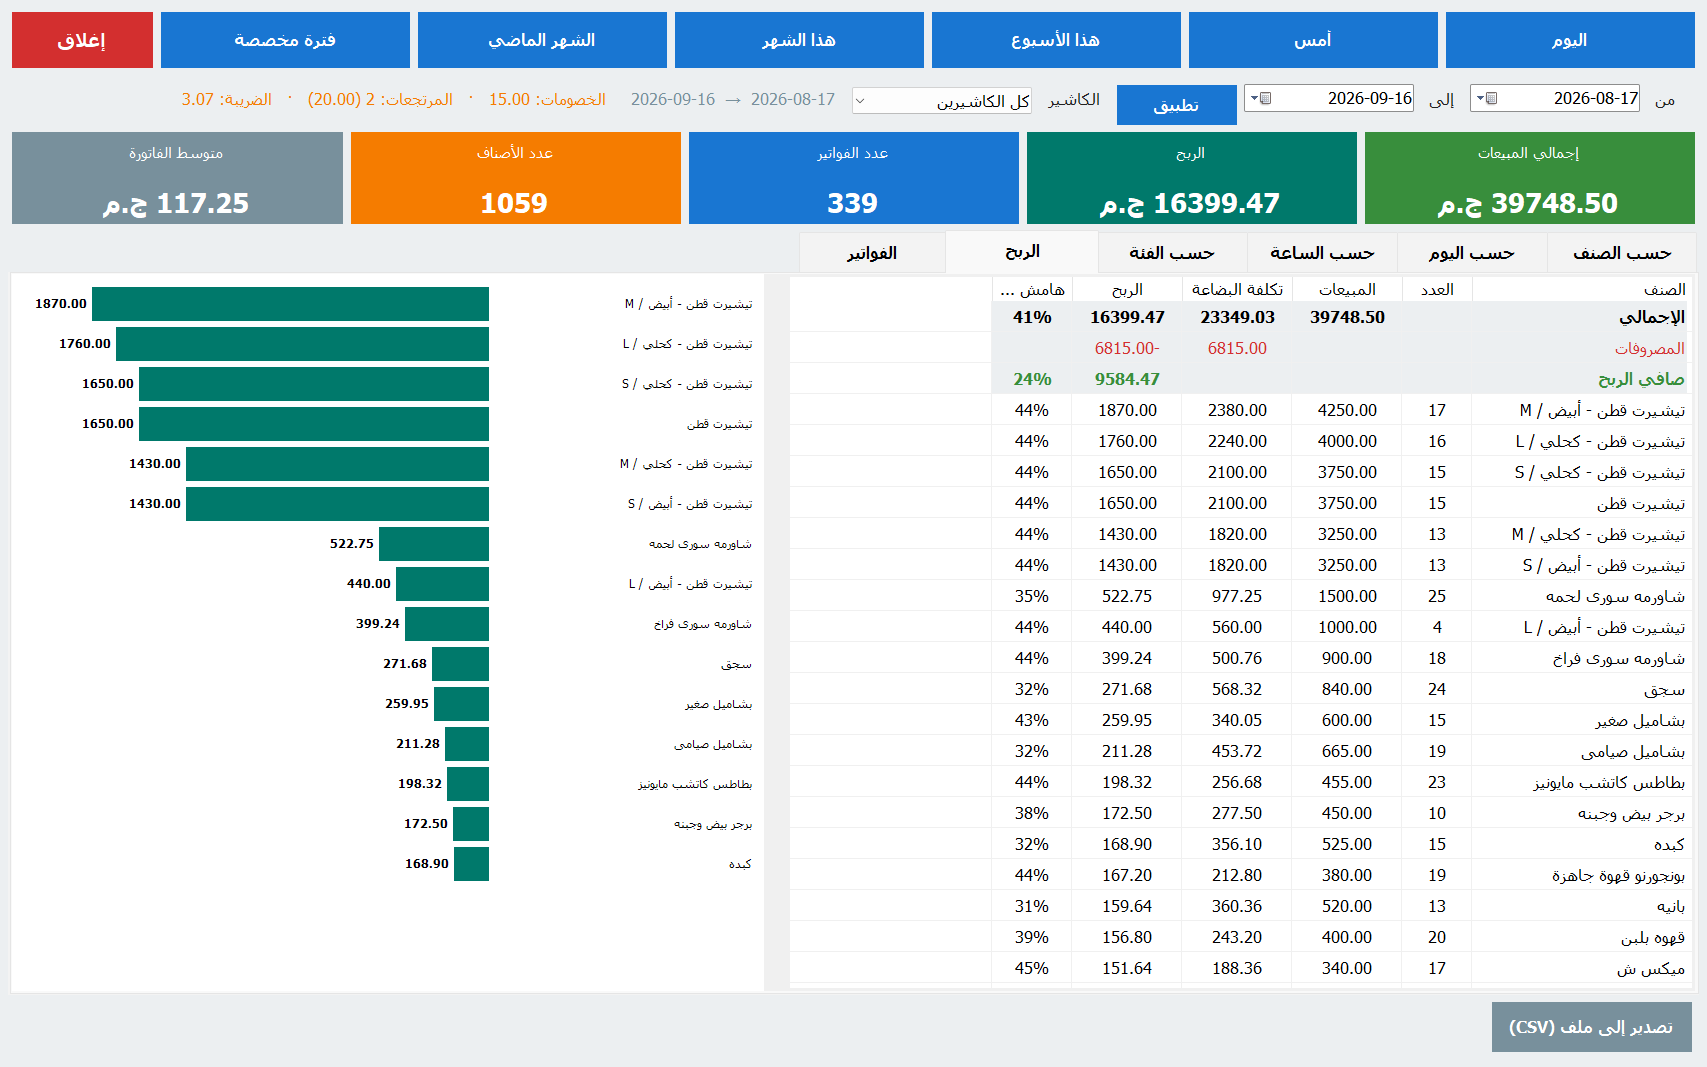
Profit = selling price − purchase cost, so enter the purchase cost for each product (Inventory or Products). Products without a cost count as all profit.
9Reports
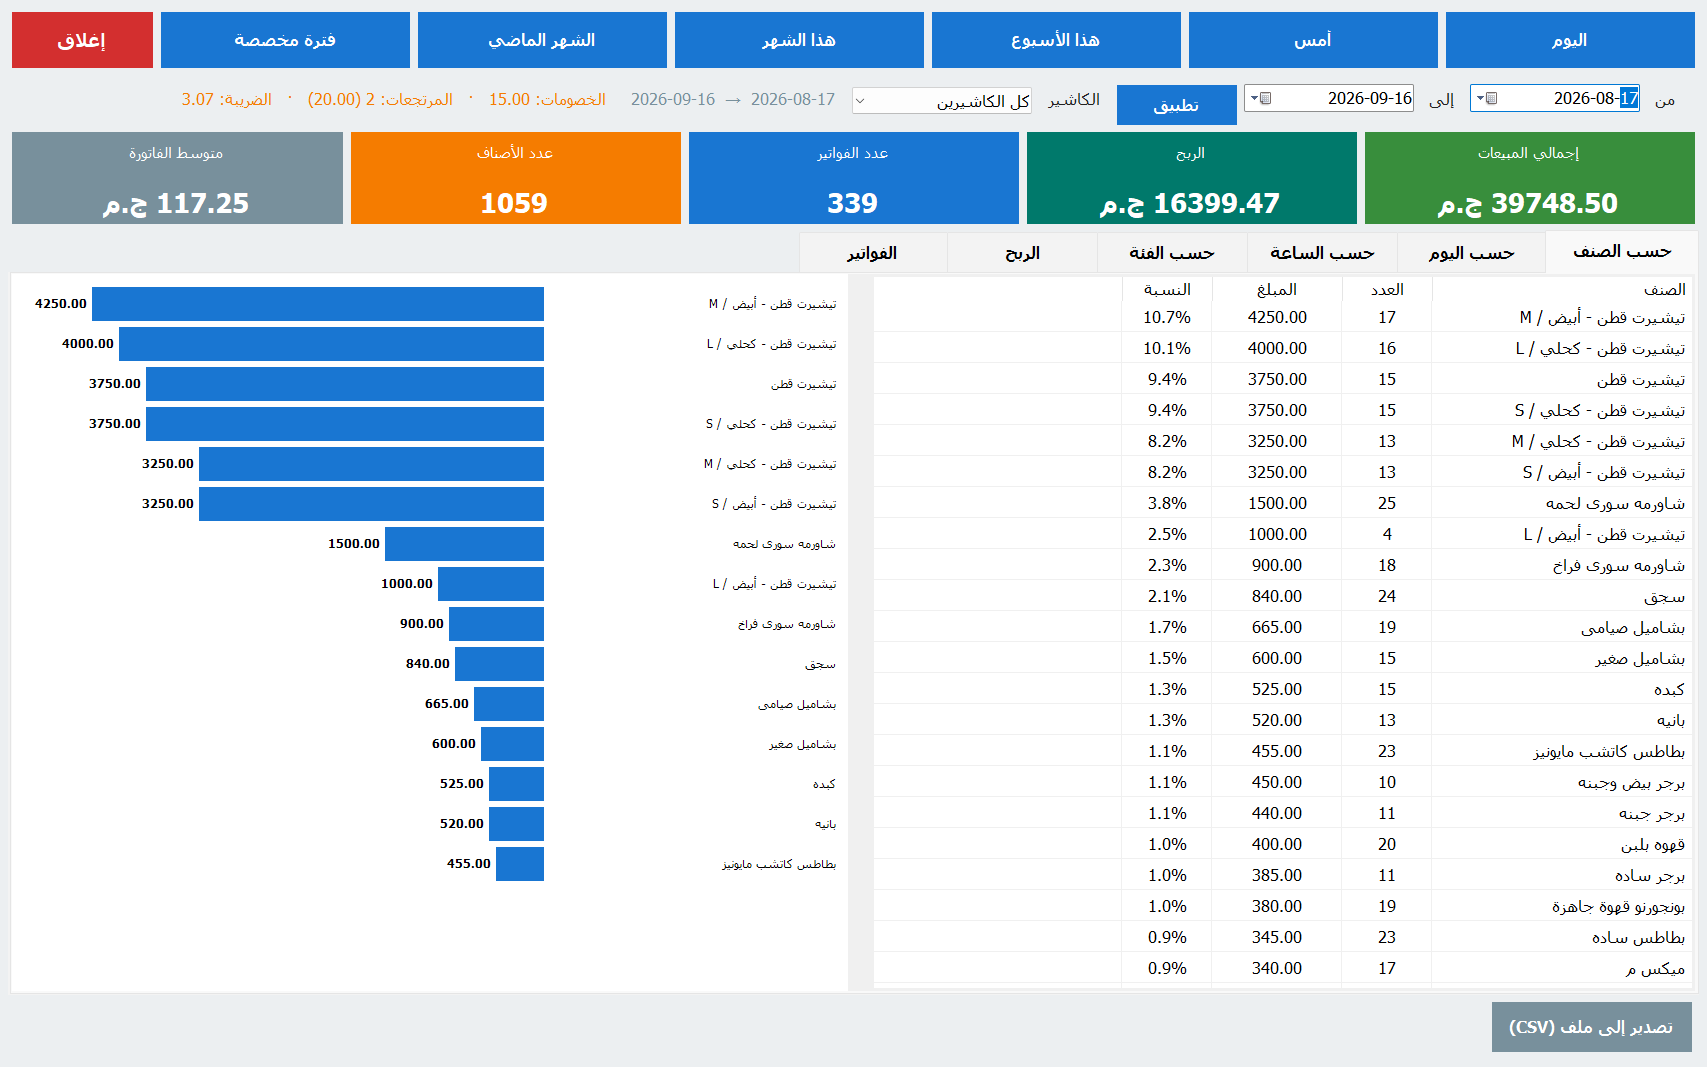
- Pick the period: Today, Yesterday, This week (starts Saturday), This month, Last month, or a custom from/to and Apply.
- The colored tiles show total sales, profit, receipts, items and the average receipt.
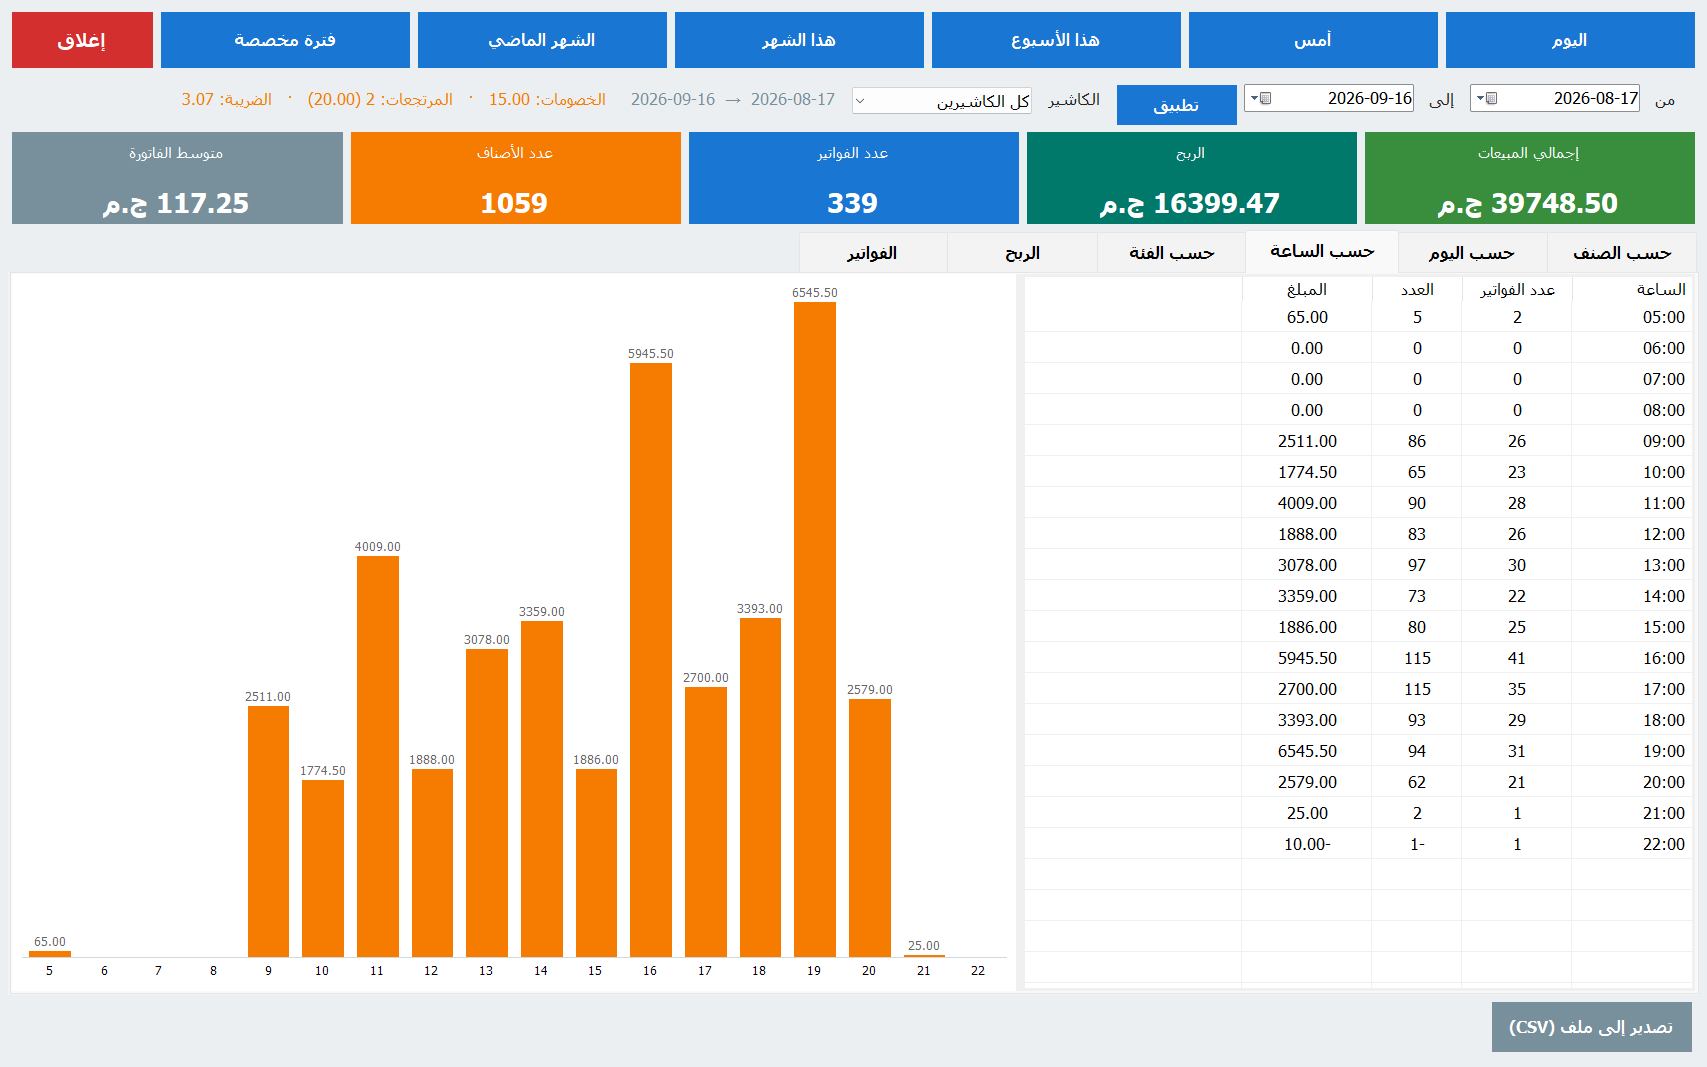
- Tabs: by product (best sellers), by day, by hour (peak times), by category, profit, and receipts (every receipt, with void and reprint).
- Cashier filter, and Export CSV saves the visible table as a file that opens in Excel (Arabic intact).
10Kitchen screen
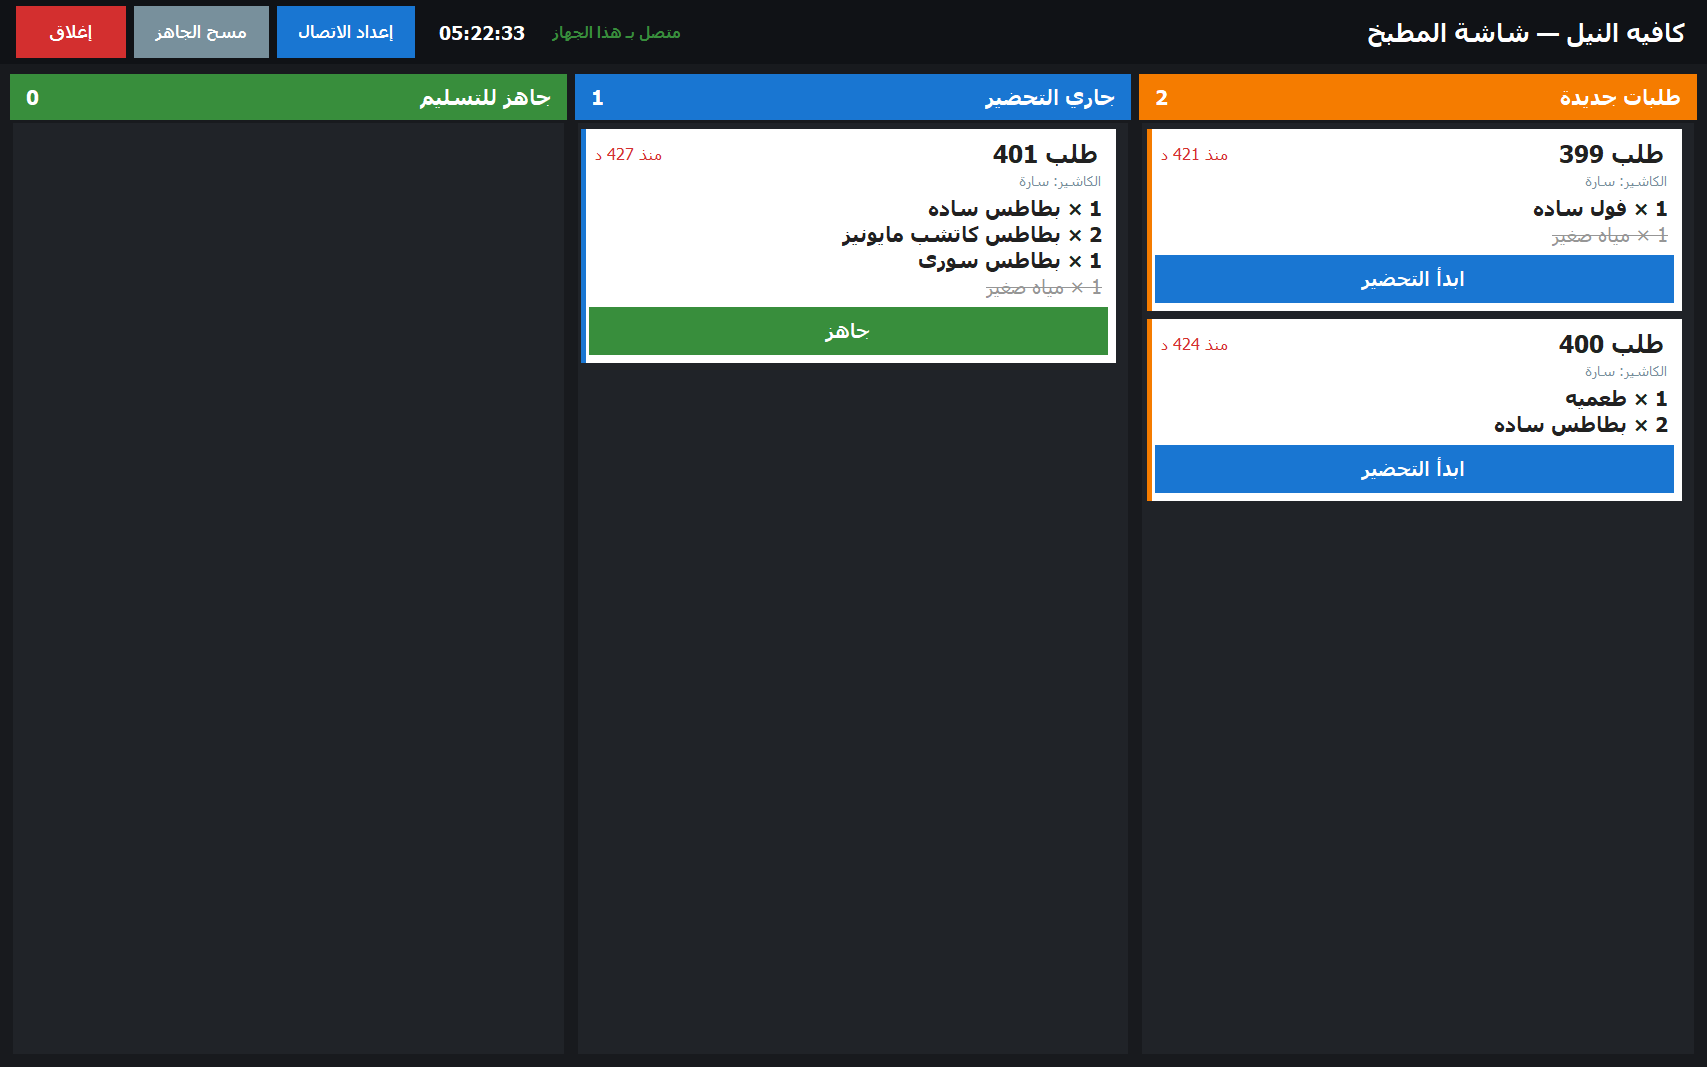
- Enable it: Settings → General → Send orders to the kitchen screen.
- A Kitchen button appears in the top bar — press it to open the board, then move it to the kitchen monitor (if a second screen is connected to the same PC).
- Three columns: New → Preparing → Ready. The cook taps a ticket to move it on. Clear ready removes delivered orders.
- Only orders containing a product marked needs cooking appear. Ready-made items (drinks, snacks) show struck through so the cook sees the whole order.
Kitchen screen on another PC (by IP)
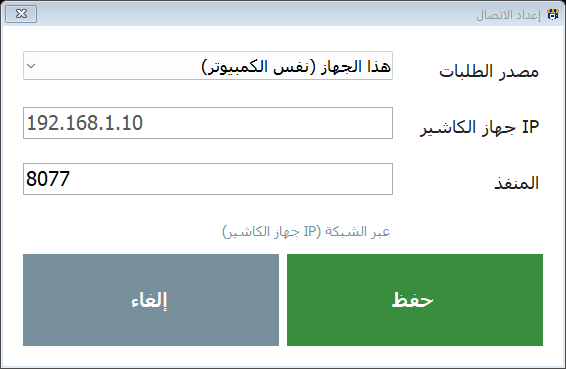
- On the till PC: Settings → General: make sure “Send orders to the kitchen screen” is on, and note this PC's IP shown under the kitchen port (e.g. 192.168.1.10). Both PCs must be on the same network.
- On the kitchen PC: install the program and open PosMasr-Kitchen.exe (it is in the same folder), press Connection settings at the top, choose Over the network, enter the till's IP and port (default 8077). The status shows at the top; several screens can connect.
- Windows may ask to allow the program on the network the first time — allow it. If it doesn't connect, check the IP and that the firewall isn't blocking the port.
11Backup & restore
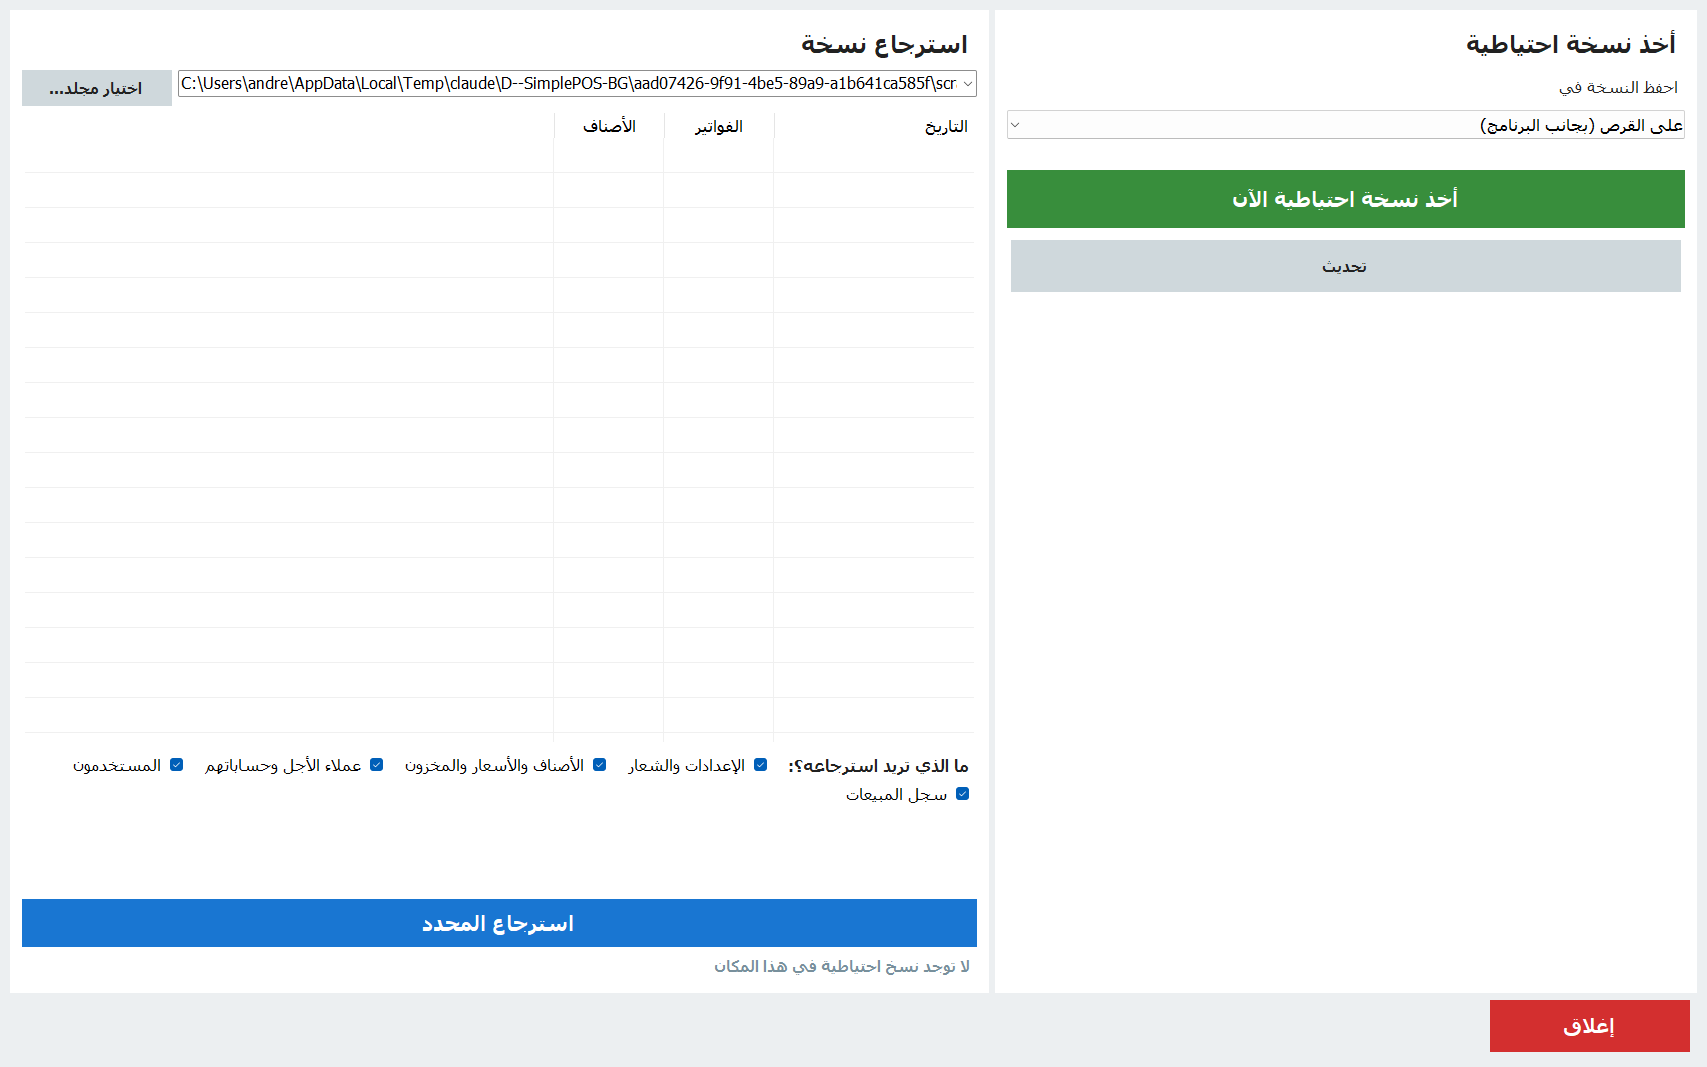
Settings → Tests → Backup & restore opens a two-part screen:
- Where (3.0): the Backup button on the sales screen (manager, Ctrl+B) or Settings → the Backup tab: back up now to a USB stick or folder, restore, open the data folder, and the automatic daily backup settings — all in one place.
- Back up: choose where — on disk (next to the program) or a USB drive (appears automatically when plugged in) — and press Back up now. A dated folder is created with products, settings, logo, credit customers, users and all sales.
- Restore: pick the backups location (or Choose folder…), select a backup from the list (date + receipt count), tick only the parts you want (settings & logo / products & stock / credit customers / users / sales history) and press Restore selected.
data\sales (one per day) and can also be opened in Excel or Notepad.12License & activation
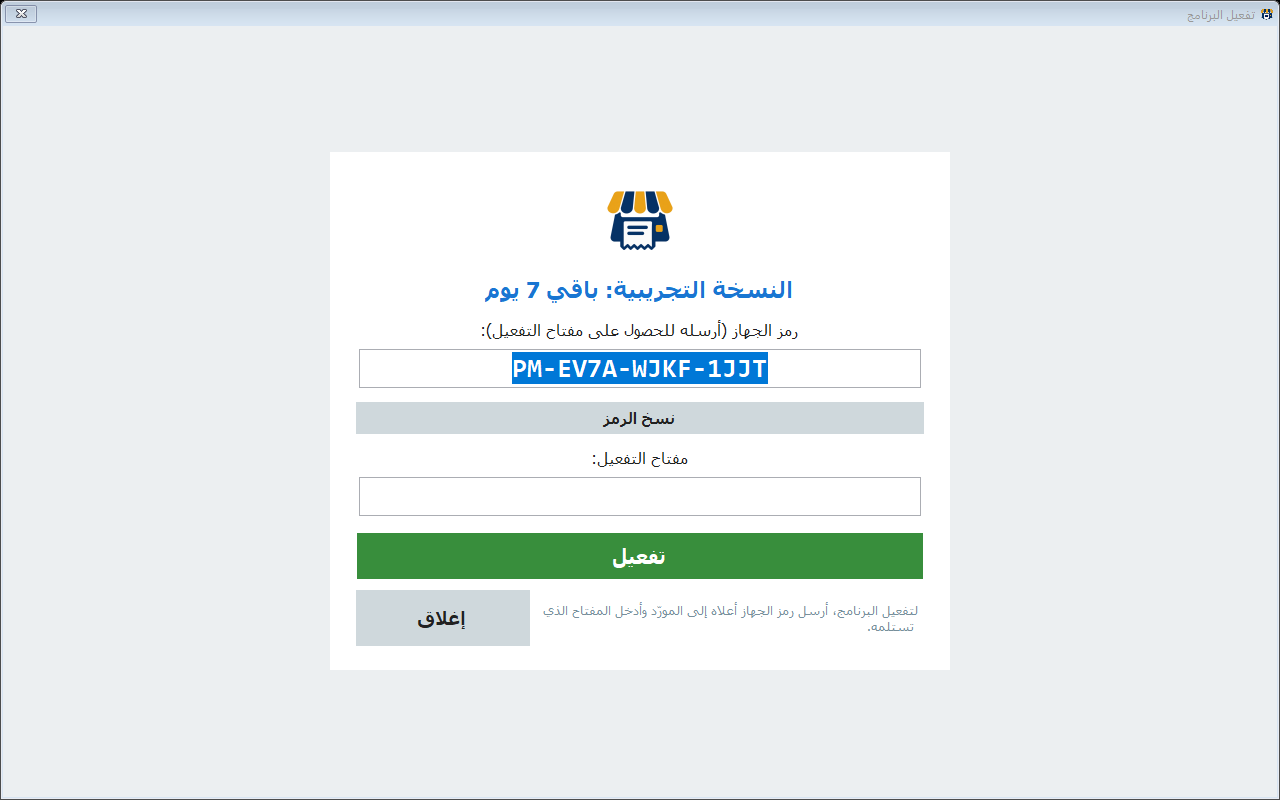
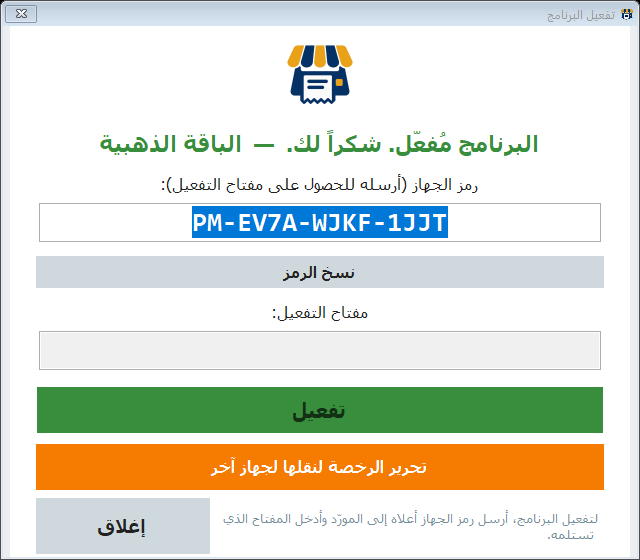
The program runs as a 7-day trial, then asks to be activated. Activation is tied to the machine:
- Open the license screen: Settings → Tests → License status (it also appears by itself when the trial ends).
- Read the machine code (e.g.
PM-XXXX-XXXX-XXXX) and send it to us — the Copy code button helps. - We send you the activation key. Type it and press Activate. The program is activated permanently on this machine.
13Your shop's name & logo
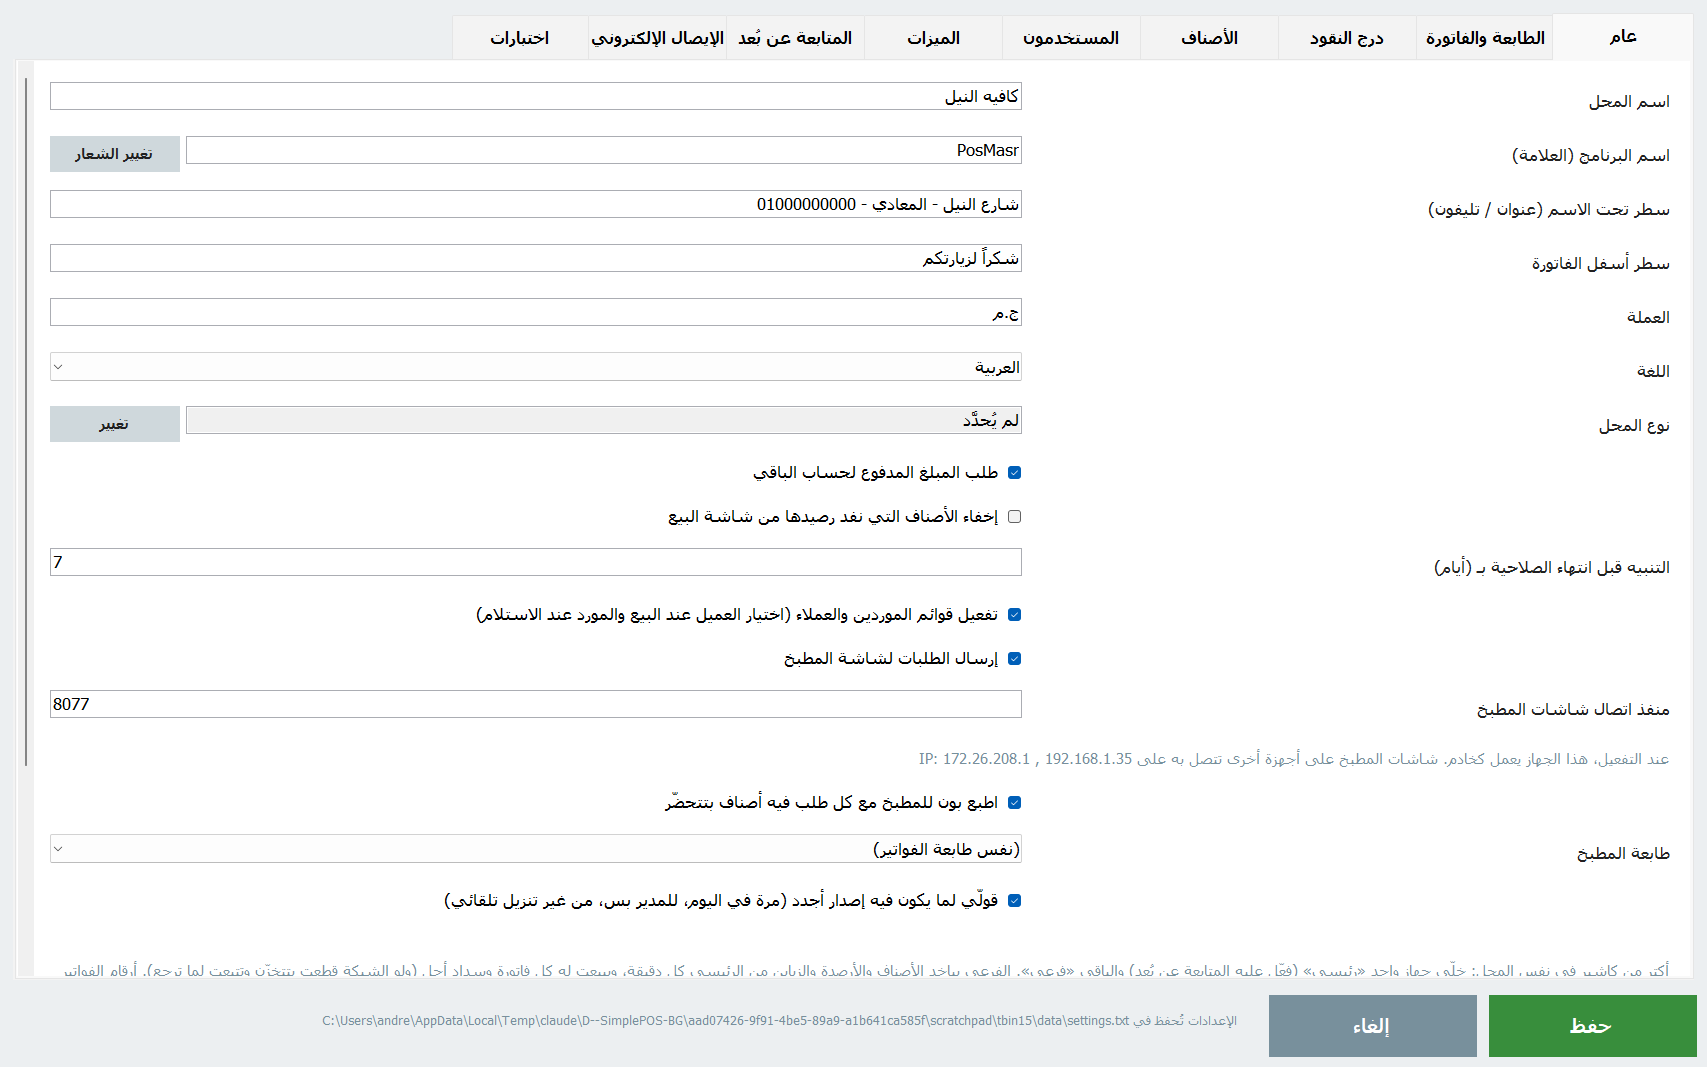
Settings → General: set the shop name (top bar and receipt), the brand name, and press Change logo to pick an image (saved as data\logo.png). The new name and logo appear on the window title, the top bar, receipts and labels — no reinstall needed.
14Keyboard shortcuts
| Key | Action |
|---|---|
| Enter / F12 | Pay |
| + / - | Increase / decrease the selected line |
| Delete | Remove the selected line |
| Esc | Close sub-windows (reports, settings) |
15Expiry dates (new in 1.2)
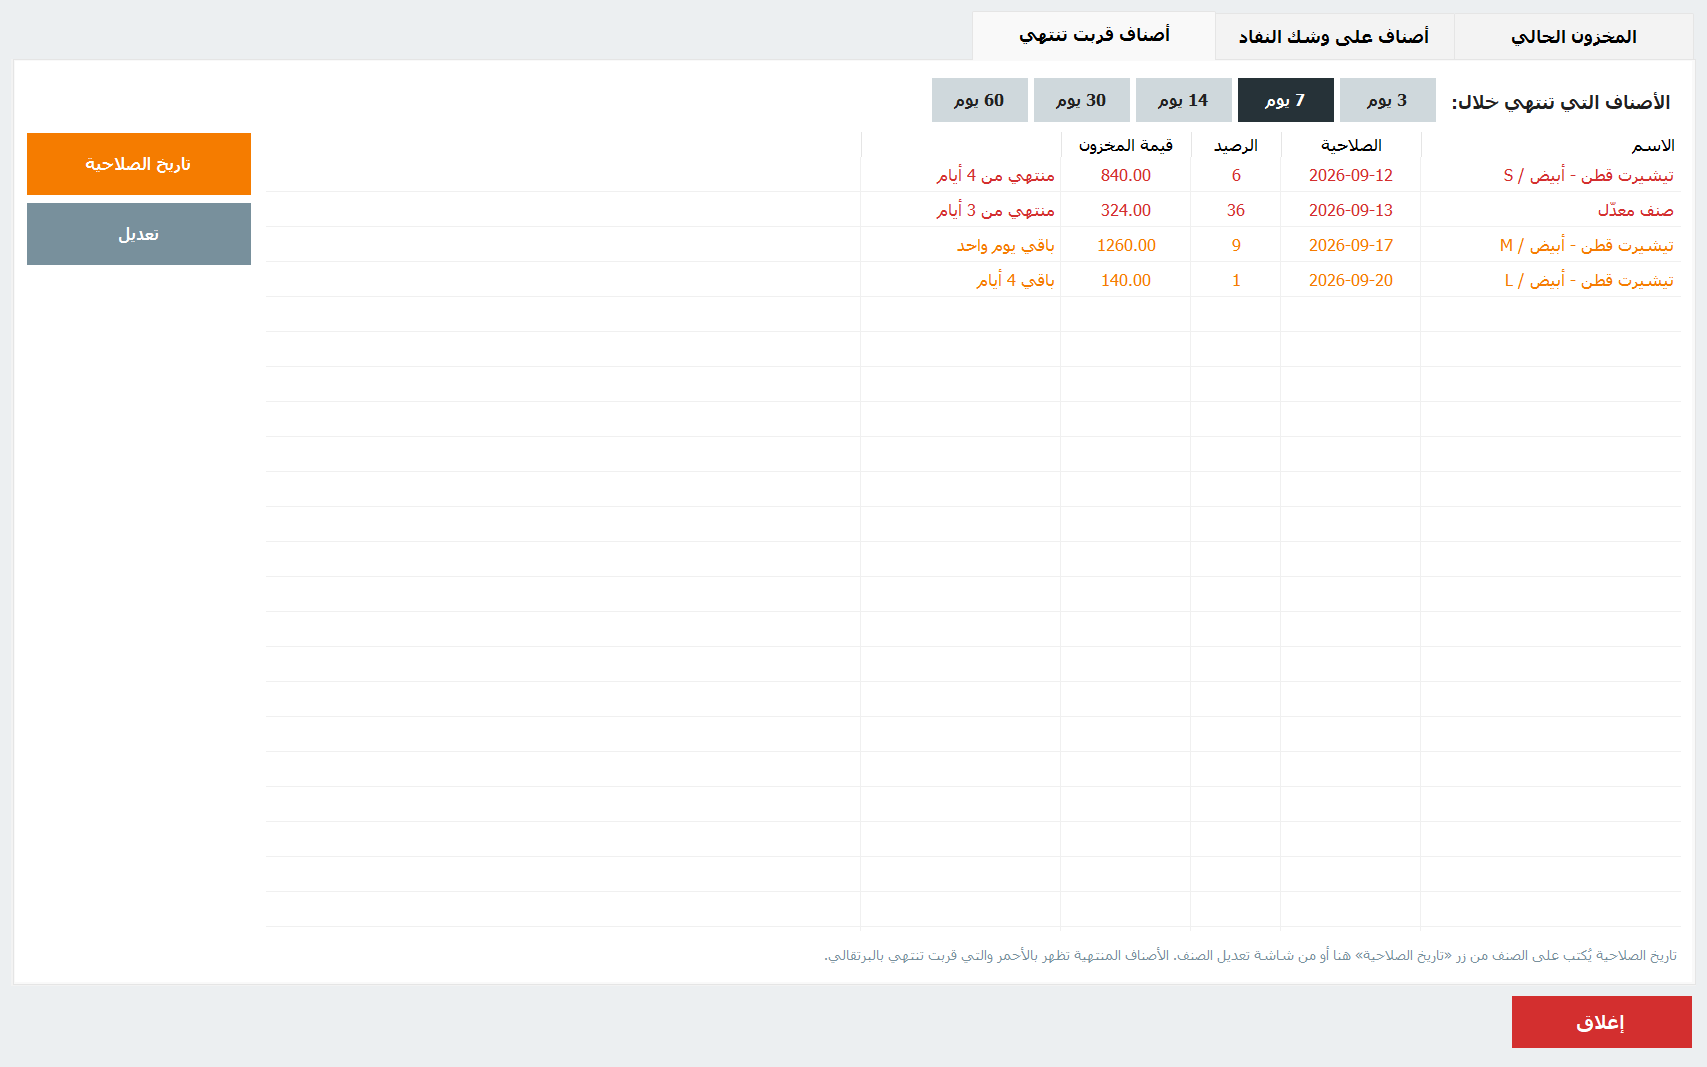
- Every product can have an expiry date: type it when adding/editing the product (or tap the 📅 calendar with +1/+3/+6/+12-month shortcuts), or select the product in Inventory and press Expiry date.
- In Current stock a new Expiry column: expired = red, close to expiry = orange.
- The Expiring soon tab lists everything that expired or expires within 3 / 7 / 14 / 30 / 60 days, with stock, its value and days left.
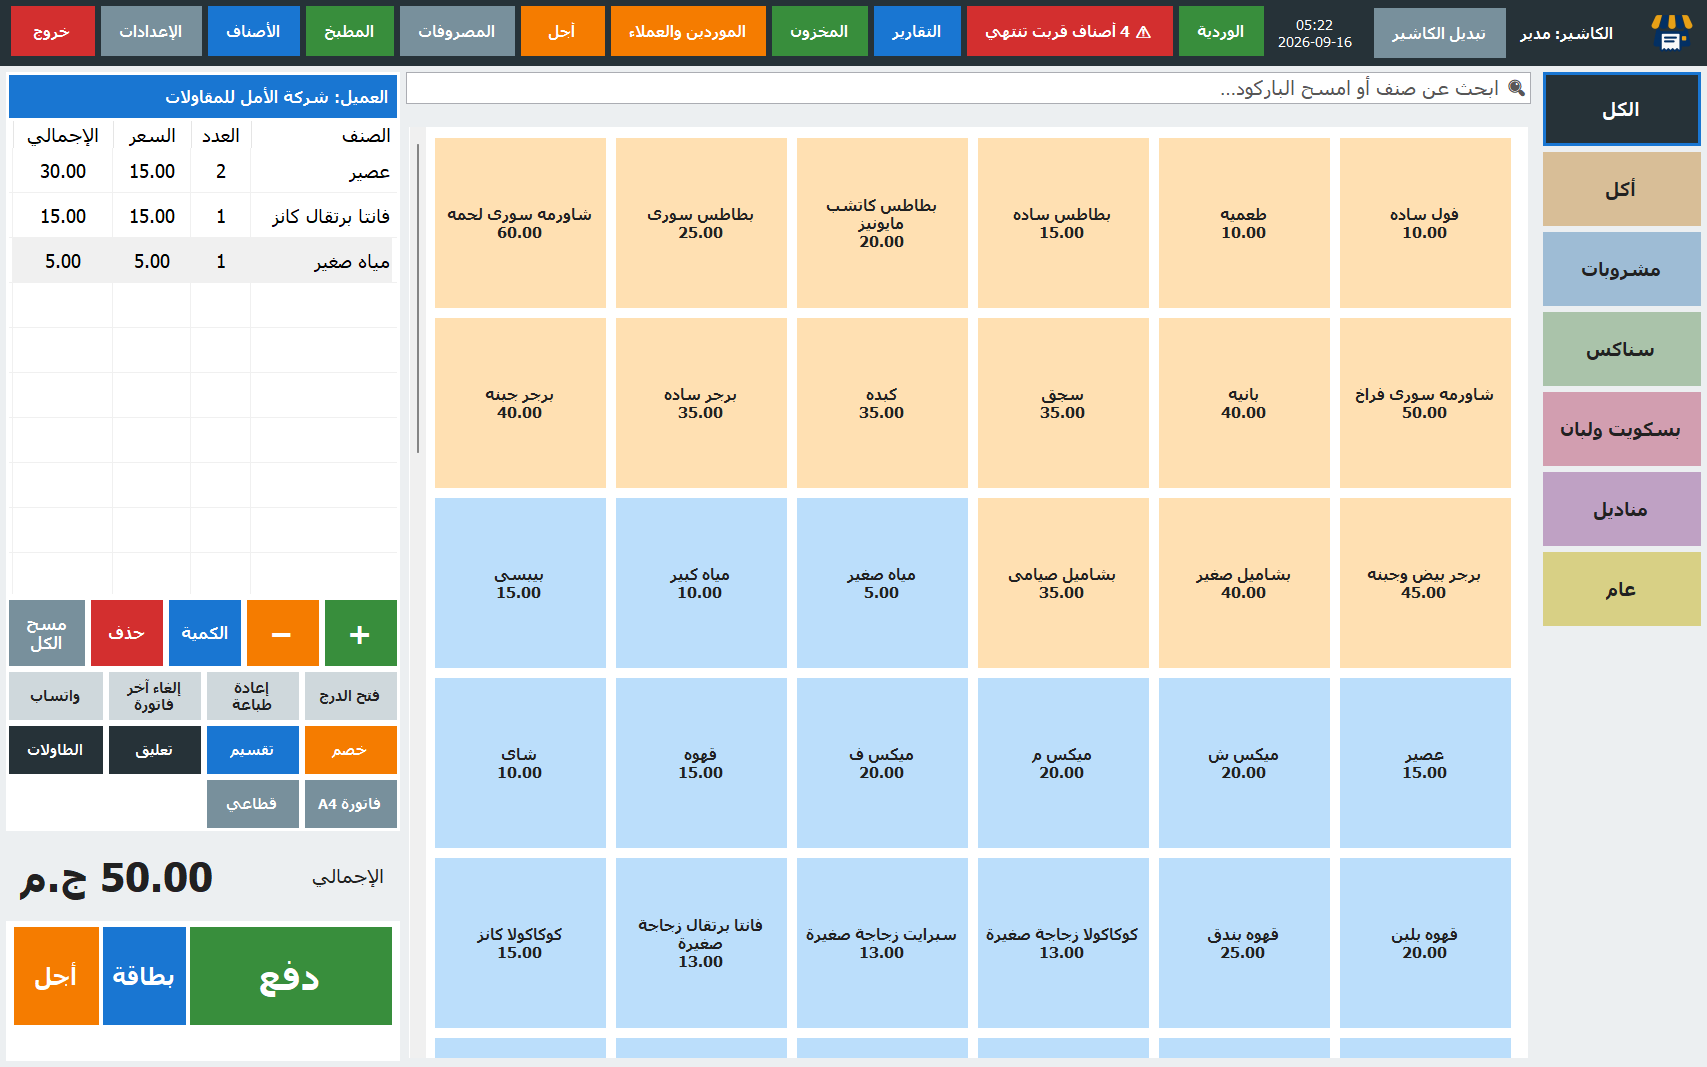
- Alerts: the manager sees a red ⚠ N expiring button in the top bar (opens that list) and a once-a-day reminder with the names. Adding an expired item to a receipt shows a warning under the cart (the sale isn't blocked).
16Suppliers & clients (new in 1.2)
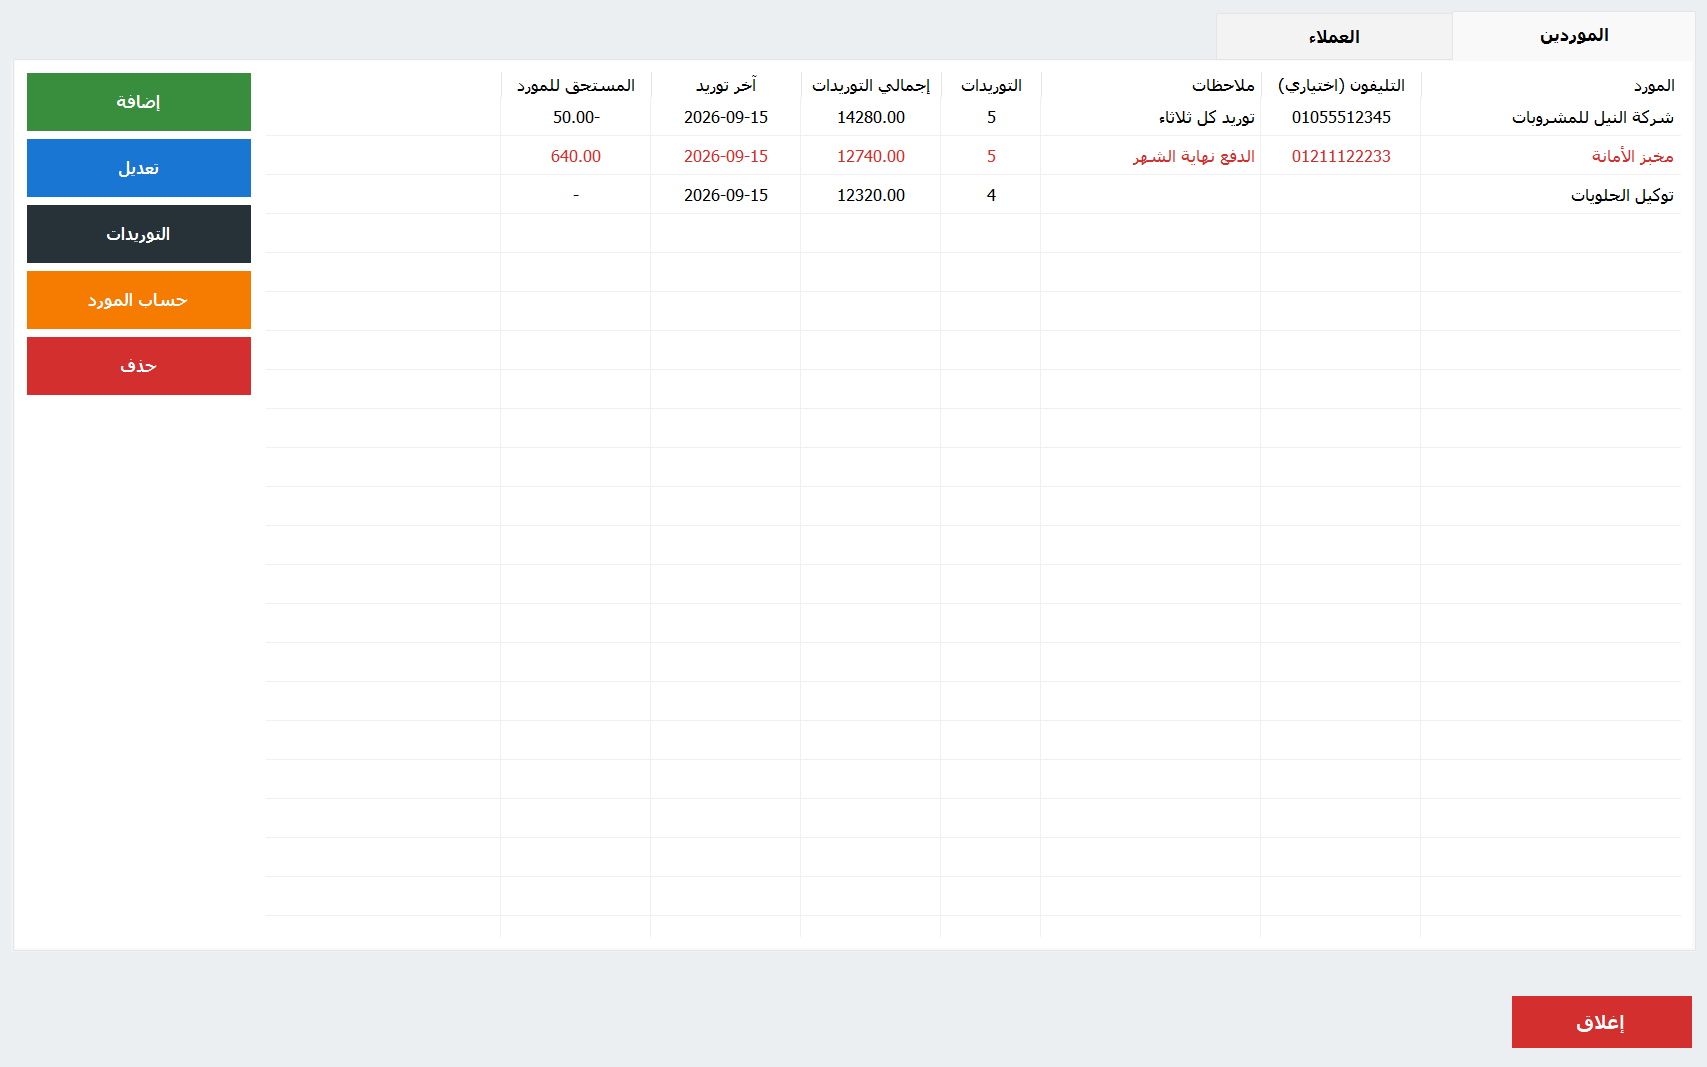
An optional feature, switched on in Settings → General → Enable suppliers & clients lists. When on:
- A Suppliers & clients button appears in the top bar: a page with a Suppliers tab and a Clients tab (add / edit / delete).
- Clients: name, phone, notes, this month's purchases, credit balance (if they buy on credit) and last activity. Statement opens the credit ledger. Credit customers and clients are the same list.
- Suppliers: name, phone, notes, number and total of deliveries and the last one. Deliveries shows everything received from that supplier (date, product, quantity, cost, expiry, who received it).
- On a sale: a “Client: none” button above the cart. Pick or type a client and the receipt is recorded and printed with the name — cash, card or credit (pressing Credit with a client picked charges that client). Cleared after every receipt.
- When receiving stock: a “Supplier: none” button in the Inventory. Pick the supplier once and every receive after it (by scan or “Receive quantity”) is logged to that supplier.
17Watch the shop from your phone (new in 1.3)
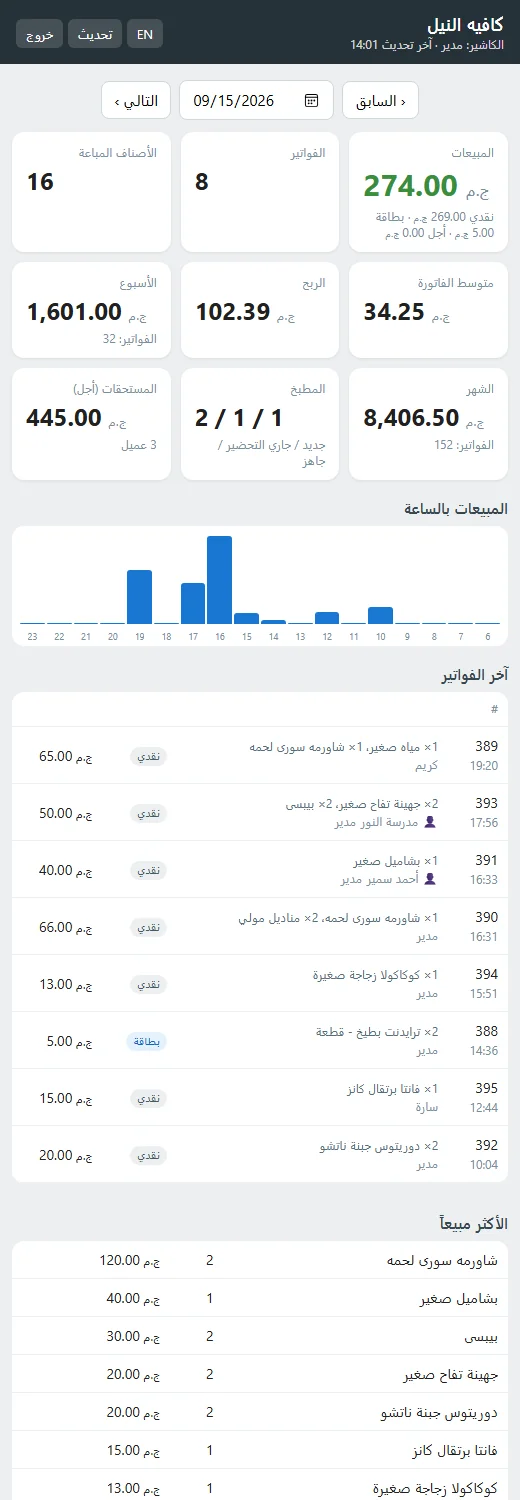
The program has a small web server built in (no IIS, nothing to install). Turn it on and open its address on your phone: today / week / month sales, sales by hour, latest receipts, best sellers, running-low and expiring items, credit owed and the kitchen queue — refreshing every 30 seconds. View-only; you log in with the manager account.
test / test — a fictional café with data that moves with the clock, including the phone Inventory and Manage pages (2.x).On the shop Wi-Fi — 3 steps
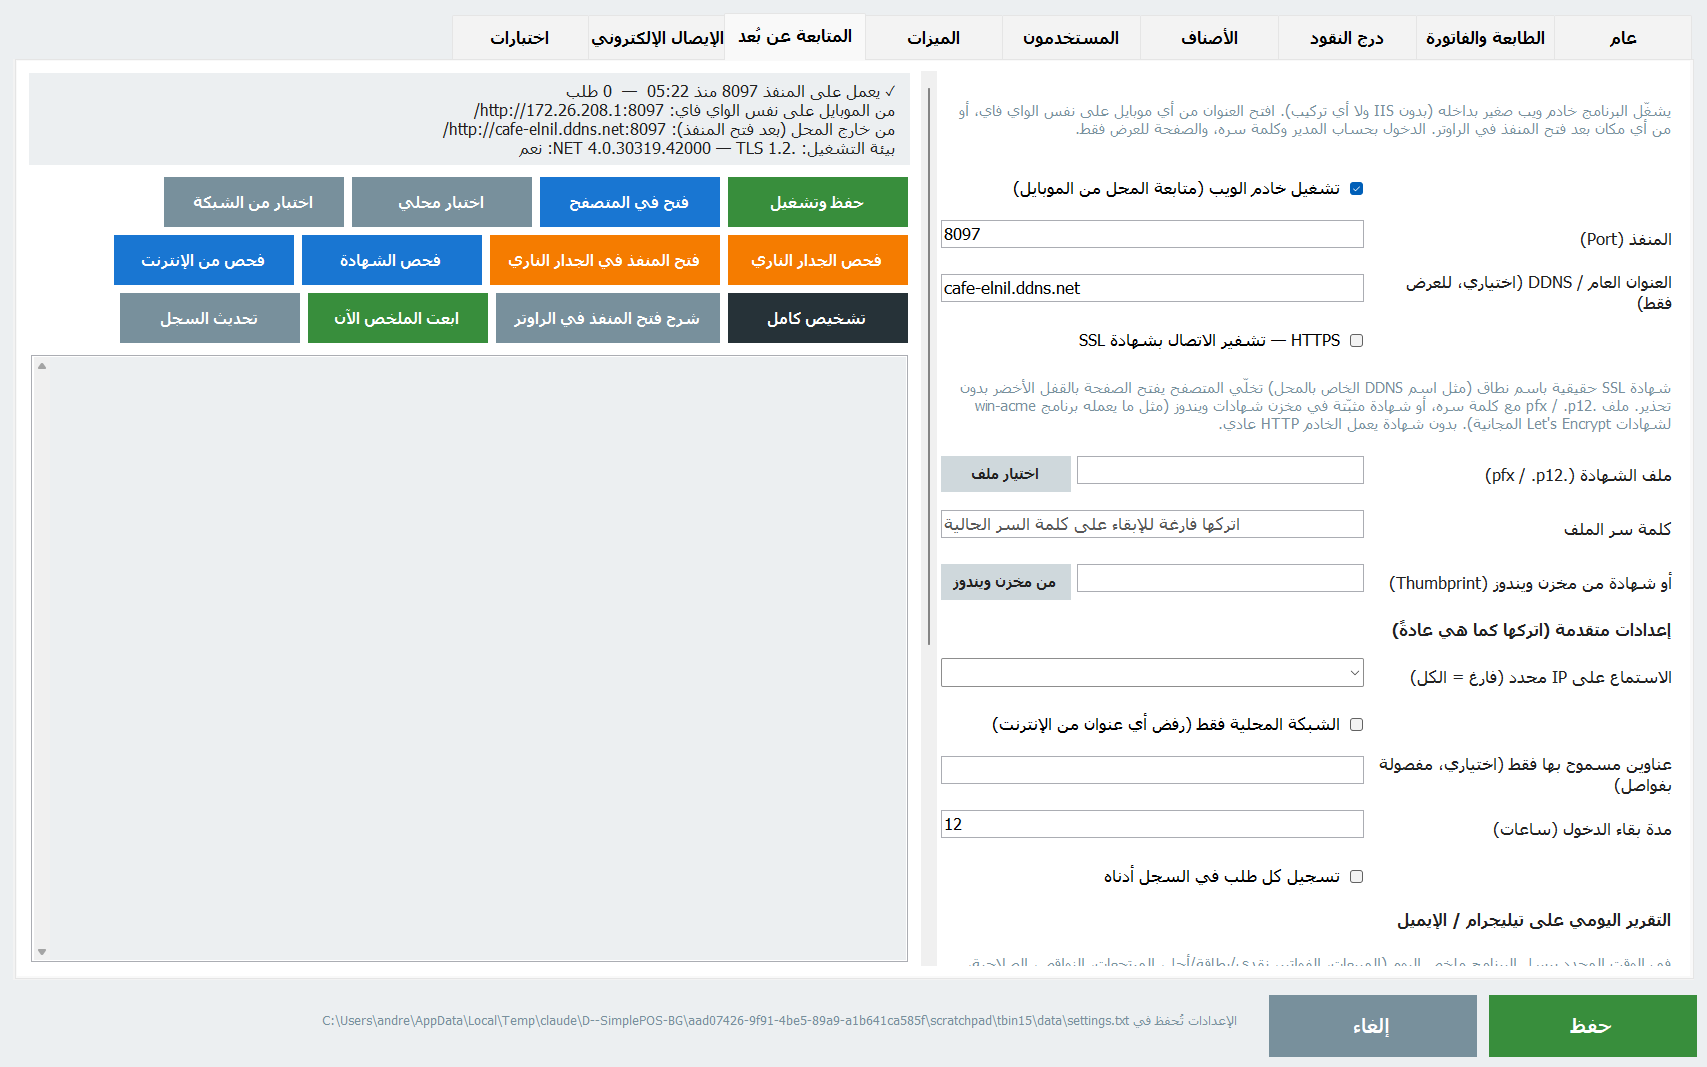
- Settings → Remote monitoring tab → tick Run the web server → Save & start. The address appears, e.g.
http://192.168.1.35:8090/. - Press Allow in firewall and accept the Windows prompt (once). Without it phones on the Wi-Fi can't reach the till.
- Open the address in the phone's browser (same Wi-Fi), log in with the manager name and password, and add the page to the home screen.
From outside the shop
Forward the port on the router (Port Forwarding) to the till PC. The Router port-forwarding help button explains it step by step, and Check from internet asks posmasr.com to try reaching your shop and tells you open / closed plus your public address. If your public IP changes, register a free DDNS name (No-IP, DuckDNS) and write it under “Public address”.
HTTPS with your own SSL certificate
Tick HTTPS in the same tab and choose the certificate: a .pfx/.p12 file with its password (stored encrypted), or one from the Windows certificate store — the easy path with free Let's Encrypt certificates via win-acme, which also renews them automatically. Check certificate shows the name, issuer, expiry and whether it matches your public address. Anyone typing http:// on that port is redirected to https. The certificate must be for a domain name (your DDNS name), not an IP.
Something not working?
Press Run all checks: server → local → LAN → firewall → internet, with ✓/✗ and how to fix the first thing that fails. Advanced overrides (usually leave them): port, listen on one IP, LAN-only, allowed addresses, session length, request log.
18Optional features (new in 1.4)
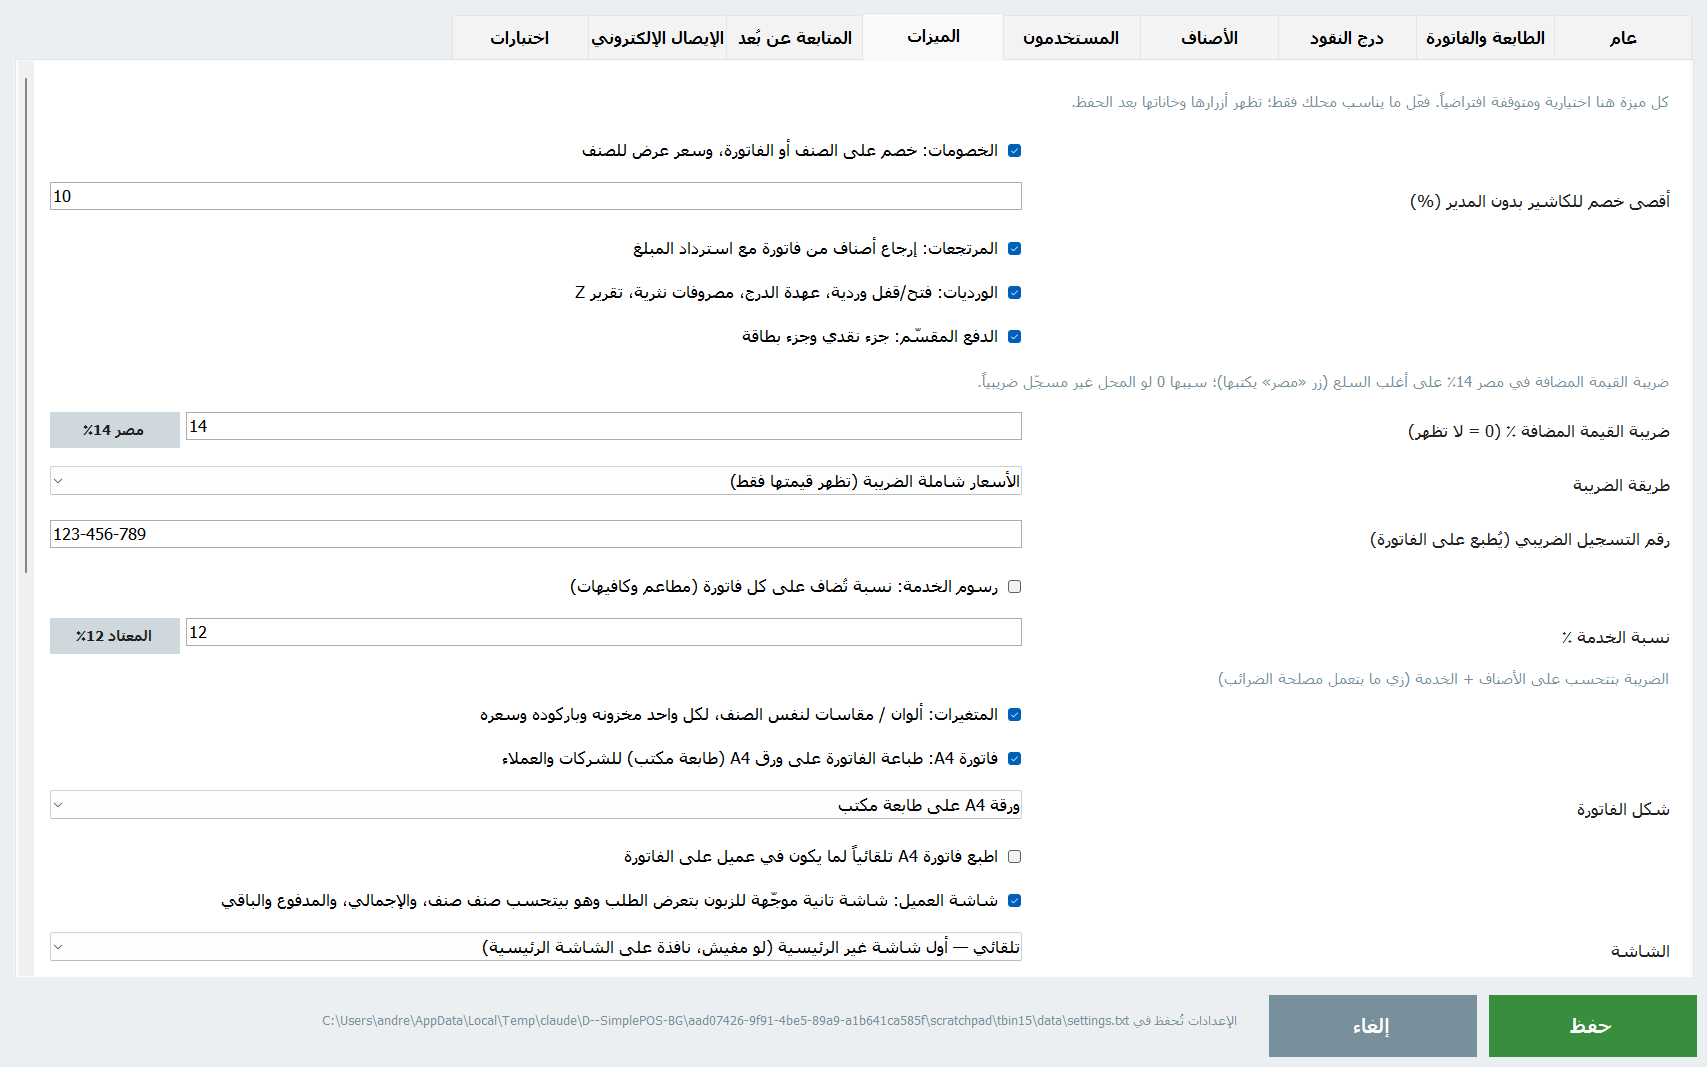
Settings → Features: every switch here is off by default. Turn on only what your shop needs; the buttons and fields appear after you save, and nothing changes until you do.
- Discounts: a Discount button under the cart — on the selected line or the whole receipt, amount or %, with a cashier ceiling (above it a manager must approve). A per-product sale price shows on the button as “4.00 (was 5.00)”.
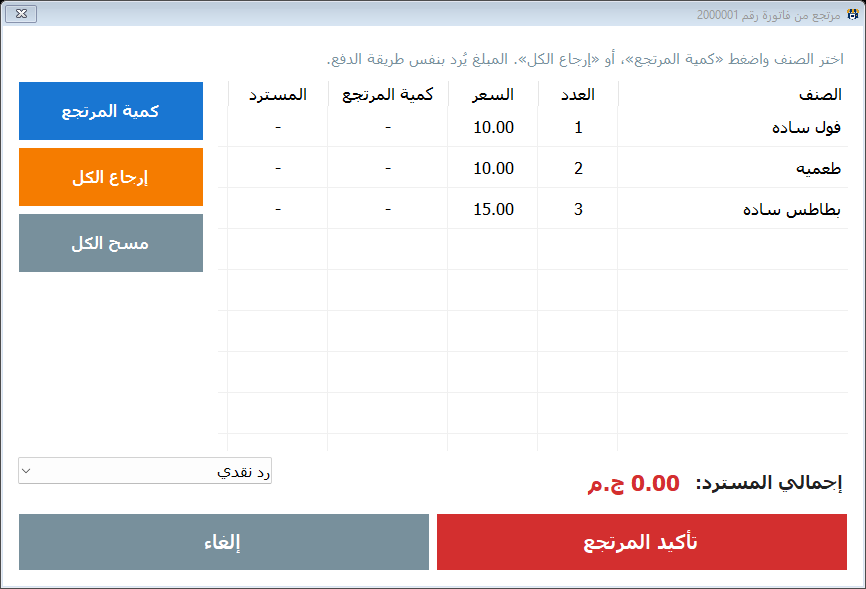
- Returns: Reports → Receipts → Return: pick the items and quantities, refund cash / to card / off the credit account. A return receipt with its own number prints and the stock comes back.
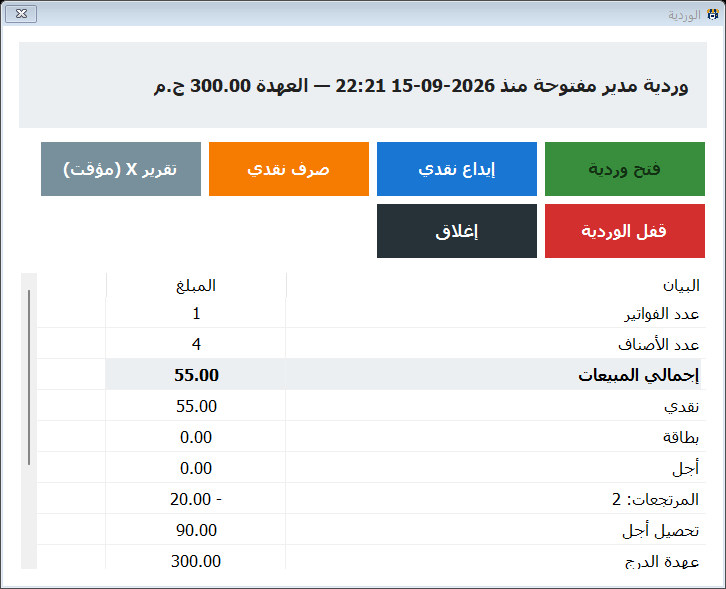
- Shifts & Z report: open the shift with the float, cash in/out with a note, and close by counting the drawer — the program prints expected vs counted and the difference, with every detail (cash/card/credit, discounts, returns, VAT, movements).
- Split payment: part cash, part card, on one receipt.
- VAT: a percentage and tax number print on the receipt (prices inclusive) and total in reports.
- By weight & scale barcodes: fractional quantities with units (kg, g, L), a Qty button, and EAN-13 scale labels (price or weight) that add the right quantity on scan.
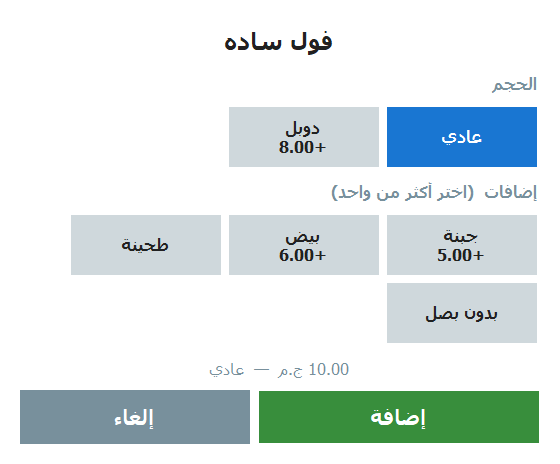
- Sizes & add-ons: small/medium/large, extra shot, no sugar… a touch picker on add; the choice prints on the receipt and the kitchen ticket.
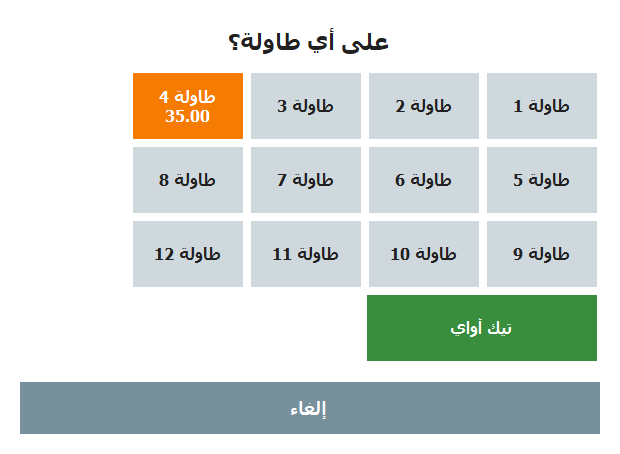
- Tables & held orders: Hold parks the cart on a table (and sends it to the kitchen); Tables resumes it for payment with the same number.
- Product pictures on the sales buttons.
- Supplier invoices & payments, and expenses: what you owe each supplier, rent/salaries/electricity… and a net profit line in the Profit report.
- Daily automatic backup on exit or shift close, and a daily summary on Telegram or e-mail at the time you choose. The phone dashboard installs as an app and gained cards for the drawer, suppliers owed and last backup.
19Import from Excel, variants, service & VAT, A4 invoice, cashier rights (new in 2.0)
- Start empty, import from Excel: a fresh install has no products. Settings → Products → Export to file (CSV) gives you the template (even empty); fill it in Excel, save as CSV UTF-8 and Import. Existing products (same code, barcode or name) are updated, new ones added, and a blank cell keeps the current value — so a file with just new prices works.
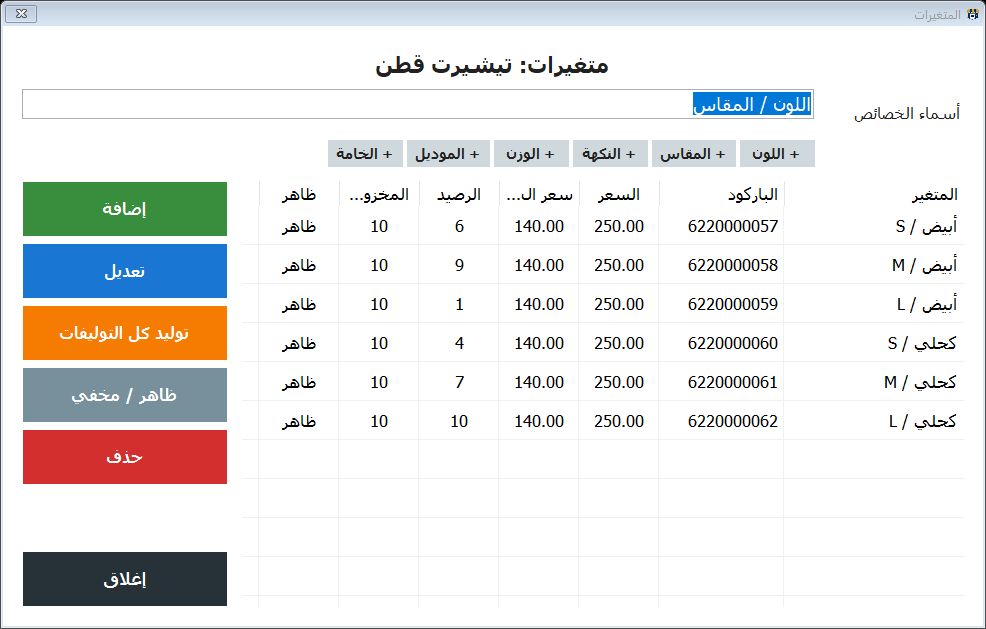
- Variants (boutiques, shoes, phones): name the attributes yourself (suggested: colour, size, flavour, weight, model, material), type the values and generate all combinations. Every variant has its own stock, barcode, price and cost; on the sales screen the product button opens a picker with the stock, and scanning a variant's barcode adds it straight away.
- Service charge & VAT with Egypt's numbers: a one-tap 14% VAT button (editable), VAT either included in the prices or added on top, and an optional service charge (usual 12%) for restaurants and cafés — VAT is computed on goods + service as the Tax Authority does. Both show next to the total before paying, print as separate lines and add up in reports, the Z report and the daily summary.
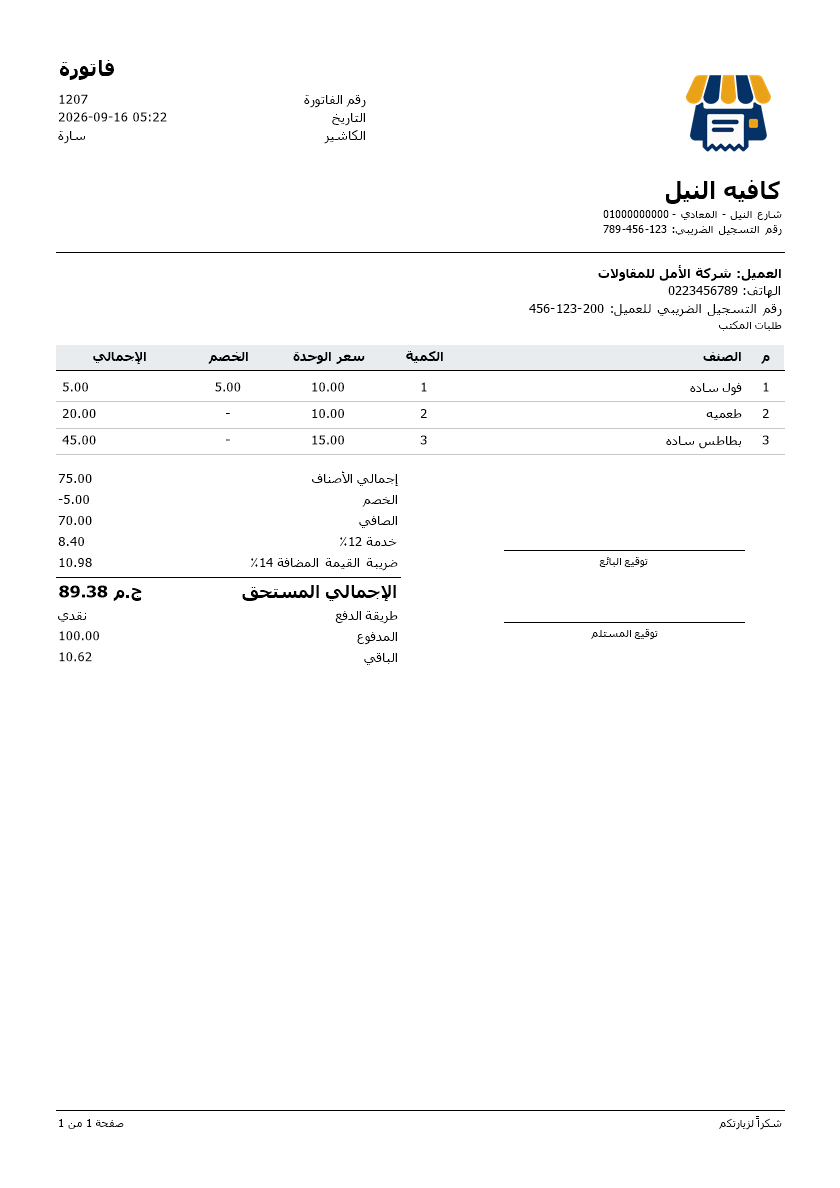
- A4 invoice: turn it on, pick the A4 printer, and an A4 invoice button appears under the cart and in the receipts list — logo, shop details and tax number, customer, an items table, service/VAT/total due, payment and signature lines; long invoices span pages. Optionally automatic whenever a client is on the sale.
- Rights per cashier: the manager does everything, a cashier sells — and now you can hand a cashier any single right (reports, inventory, edit products, void, returns, credit, expenses, close another shift, exit…) or take a default one away. Whatever they lack still works when the manager types their password on the spot.

20Stock-take, inventory & management from your phone, e-receipts (2.0)
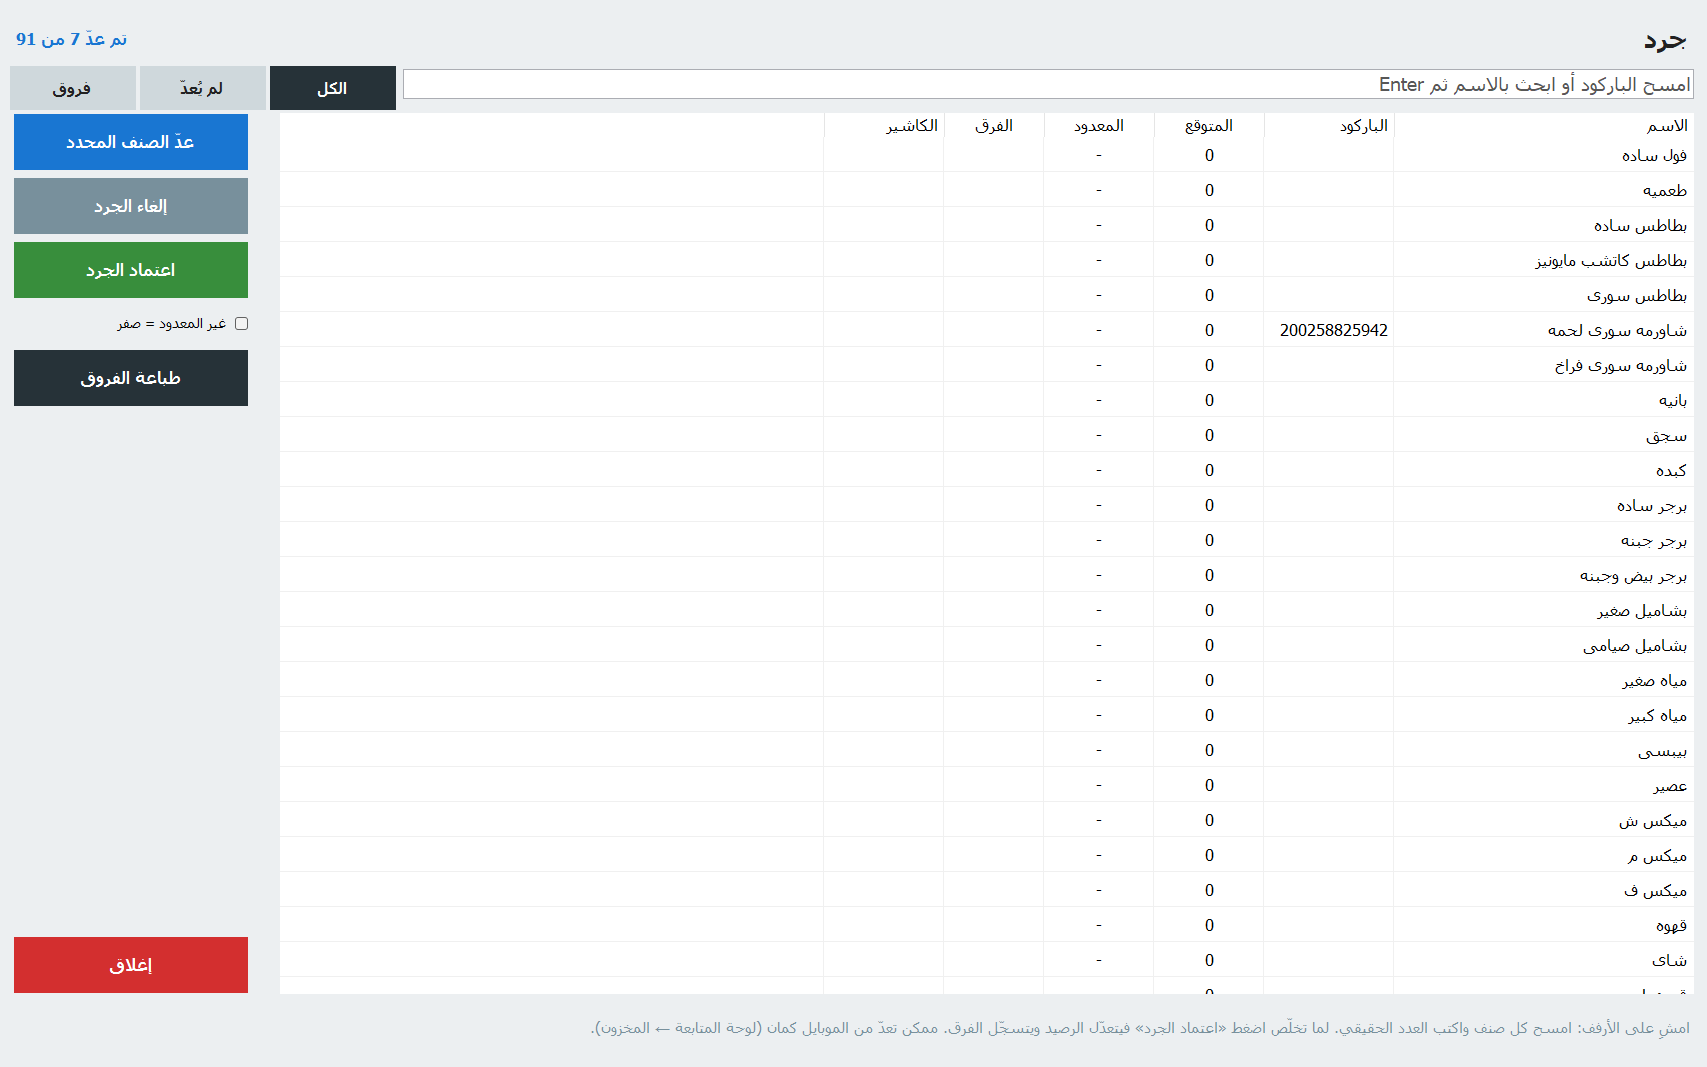
- Stock-take: Inventory → Stock-take. Scan or pick each product, type what is really on the shelf, see expected vs counted and the differences in colour, then Apply — stock is set, the variance is saved and can be printed with its value at cost. Several people can count at once, from the till and from phones.
- Inventory from your phone: the owner portal has an Inventory page — count the stock-take, add or edit any product, receive stock with cost and supplier, and scan barcodes with the phone camera (Chrome on Android over HTTPS; typing the code always works). The till picks the change up within seconds. No barcode reader needed.
- Manage from your phone: a Manage page with reports over any period (totals, by product, category and cashier, every receipt with its lines), credit accounts (who owes what, statements, record a payment) and — with the suppliers feature — expenses and supplier invoices/payments. Every action is recorded with the manager's name.
- Invoice on the receipt printer: no A4 printer? Choose the detailed tax slip: shop tax number, client and their tax number, net, service, VAT, total and a signature line — on the same thermal printer.
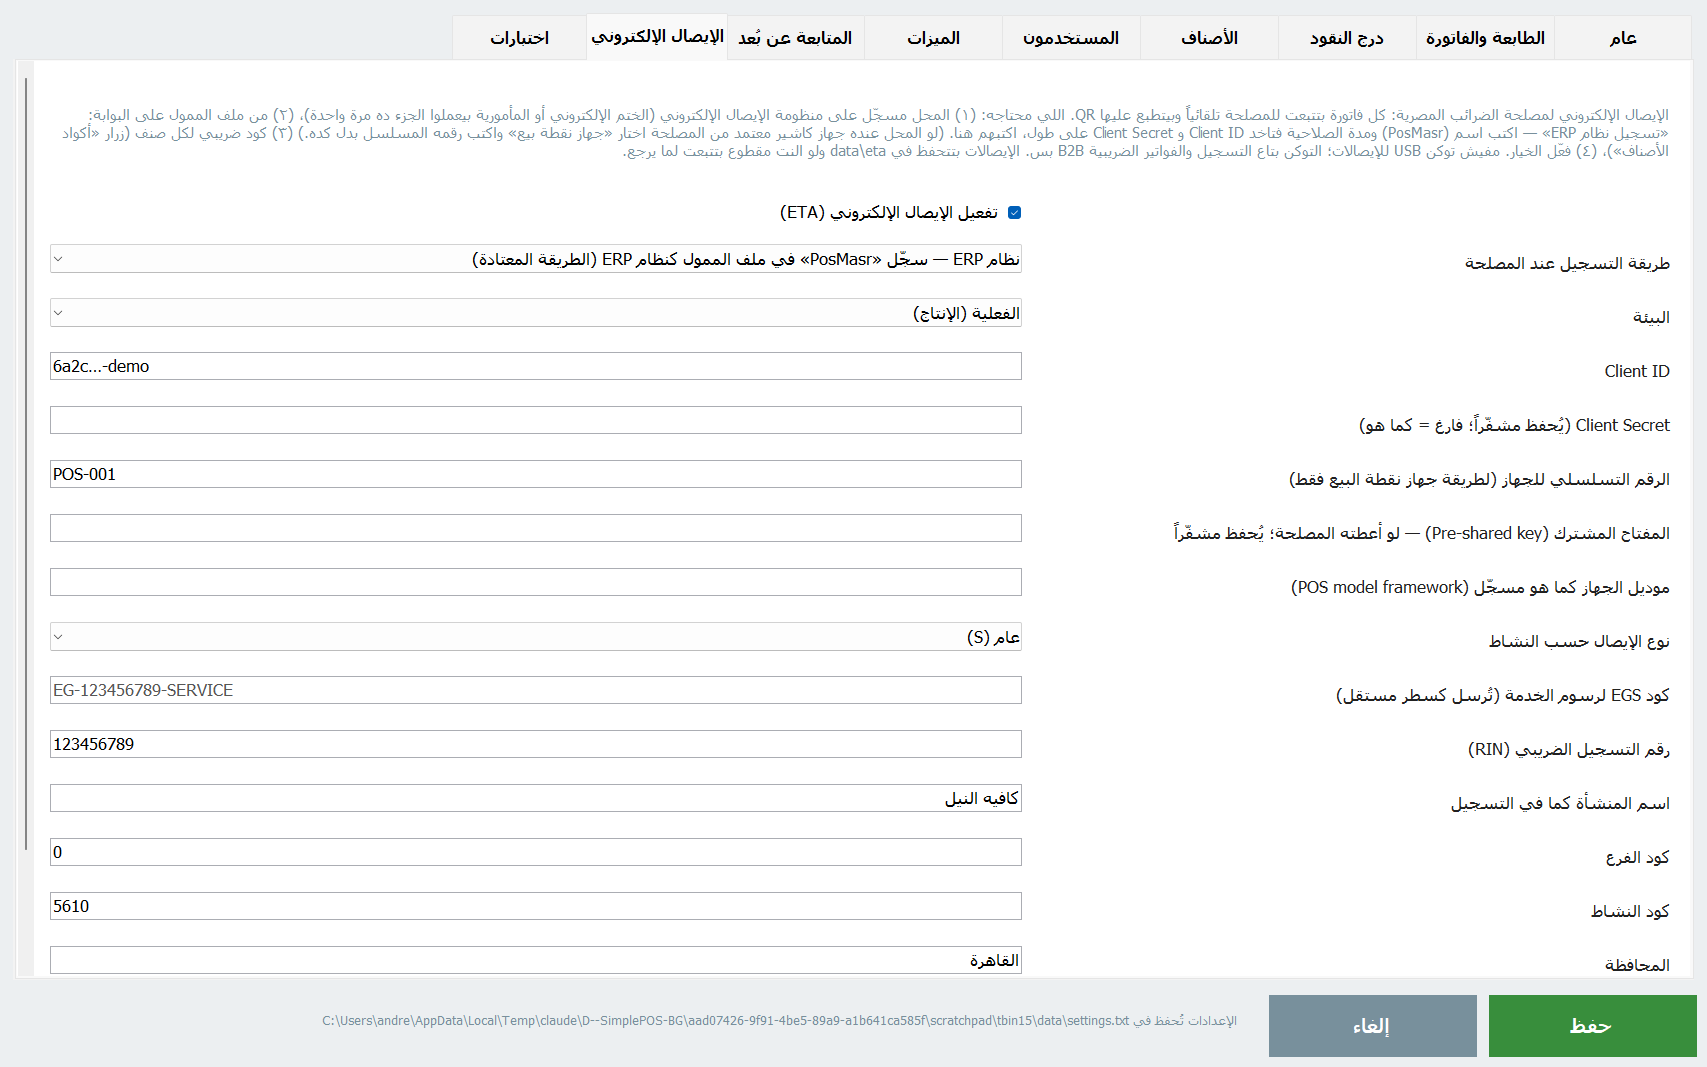
- E-receipts (Egyptian Tax Authority): once the shop is enrolled (the USB electronic seal or the tax office does that part), open the taxpayer profile on the ETA portal, choose Register ERP system, type PosMasr and a validity period, and copy the client id and secret it gives you into Settings → E-receipts. Give every product its GS1 or EGS item code (the program lists the missing ones and fills them from barcodes) and switch it on: receipts go to the ETA automatically, queue offline, and print the ETA QR code. No certified device and no signature are needed for receipts.



21Customer display on a second monitor (2.1)
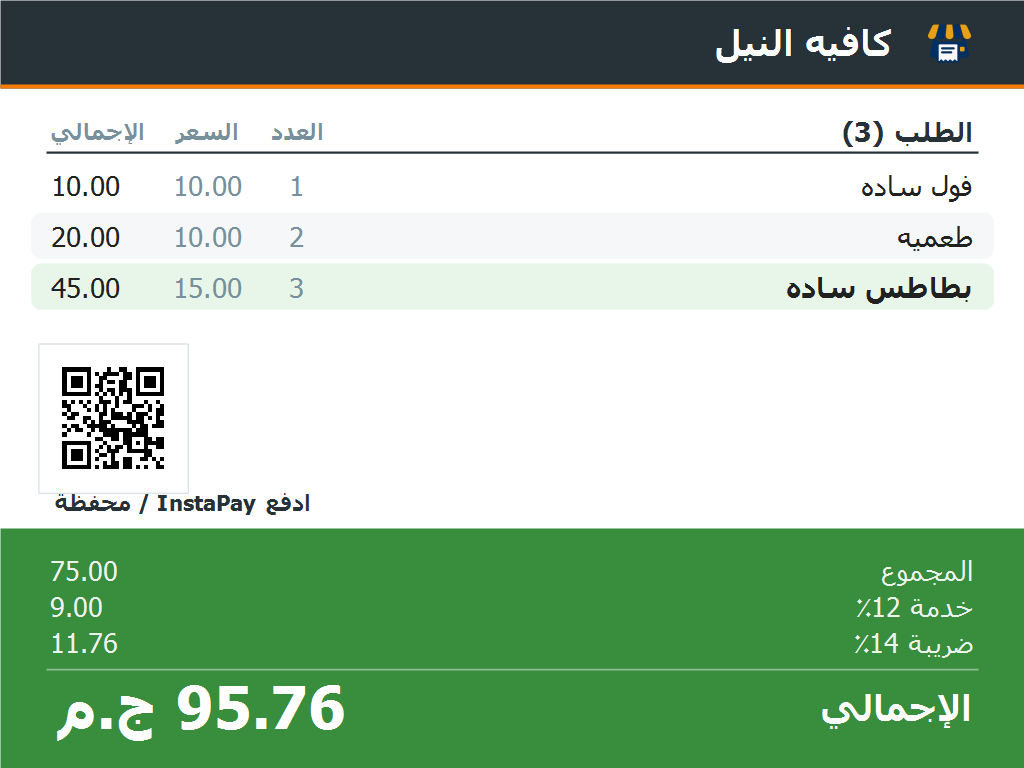
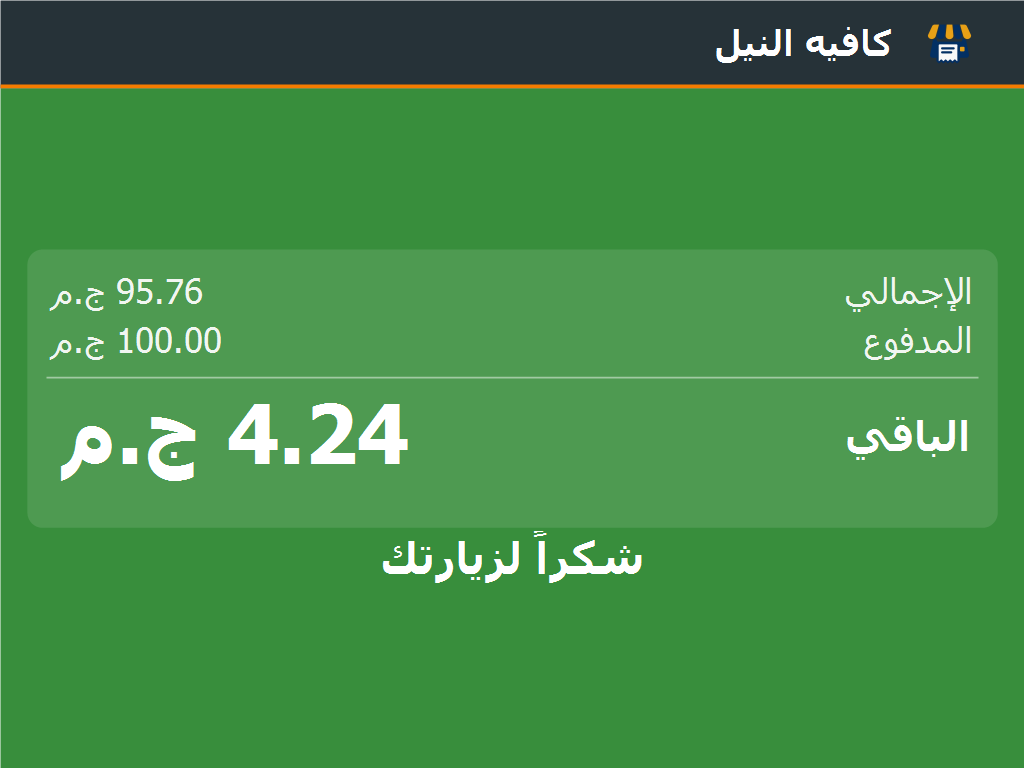
- What it is: a monitor turned towards the customer, like the ones at big fast-food chains. It shows the order as the cashier rings it up — every line with its quantity, price and total, then subtotal, discount, service and VAT when they apply, and the grand total. After payment it shows the amount paid and the change in huge digits (or “paid by card” / “on account”) with a thank-you, and your logo with a welcome message while nothing is being sold. The customer can correct the cashier before the receipt is printed.
- Setting it up: plug any second monitor into the till PC (HDMI, VGA or a USB display adapter), set Windows display mode to Extend (not Duplicate), then Settings → Features → tick Customer display. It opens with the program and fills the second monitor; “Auto” picks the first monitor that is not the main one. With one monitor it opens as a small window so you can see what the customer would see.
- Details: the welcome message is yours to write; the last item added is highlighted; long orders keep the newest lines visible; the screen never takes the keyboard away from the cashier. Gold package or higher.



22Wholesale & retail prices (2.2)
- Switch it on: Settings → Features → Price levels (off by default). The product editor gets a wholesale price field (empty = same price); the Excel import takes a column named
price2or its Arabic nameسعر الجملة. - On the sale: a Retail / Wholesale button under the cart. Tap it before ringing up and the items are priced at the wholesale level; it goes back to retail after every receipt. Items with add-ons keep their price.
- Wholesale clients: tick wholesale client on a client and the cart switches by itself the moment you pick them. The receipt prints “Wholesale prices”.
23Payment QR: InstaPay / wallet (2.2)
- Settings → Features → Payment QR, then Choose picture: save your account's QR from the InstaPay or wallet app as a picture and pick it. Write the caption under it if you like.
- The code shows on the customer display while the order is being rung up, so the customer scans and pays without asking for a number. Tick print the QR on every receipt to have it at the bottom of receipts too.
24Kitchen ticket printer (2.2)
- Instead of, or next to, the kitchen screen: Settings → General → print a kitchen ticket for every order with items to prepare, and pick the kitchen printer (any second thermal printer; “the receipt printer” if you have one). Needs “send orders to the kitchen screen” on.
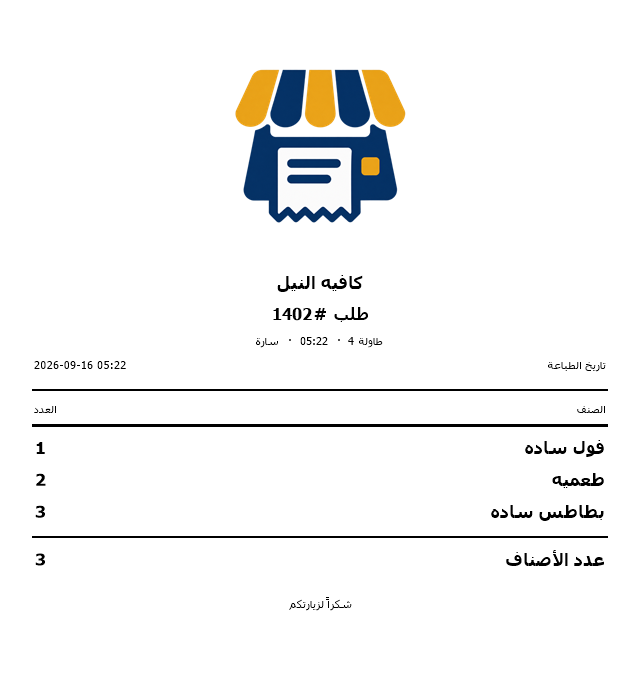
- The ticket carries the order number, table, time and cashier, and only the items that need preparing, in a big font. It prints with every sale and every “hold” on a table; orders with nothing to cook print nothing.
25Receipt on WhatsApp (2.2)
- The WhatsApp button under the cart (next to Reprint) sends the last receipt as text to the customer's number: the client's number is filled in when the sale is on a client, otherwise type it (01xxxxxxxxx).
- The message has the items, discount, service, VAT, total, paid and change — and the tax authority link when e-receipts are on. WhatsApp (web or the app) opens with the message ready; you just press send.
26A second till in the shop (2.2)
- A second till is a second license at 40% off, and the two PCs talk over the shop's network: one primary keeps the products, stock, clients and the credit ledger; the secondary follows it. Settings → General → “This till is”.
- On the primary: choose “primary” and switch on remote monitoring (the secondary uses the same port). It needs a manager account with a password. On the secondary: choose “secondary”, type the primary's IP and port, a manager name and password, and press Test. After saving it pulls the products, stock and clients every minute.
- Every receipt, void, return, credit payment and new client on the secondary goes to the primary. If the network drops nothing stops: it queues in the secondary and goes through when the network is back. Receipt numbers come from the primary; while it is unreachable the secondary numbers from its own range (2000001, 2000002…).
- Products, receiving and stock-takes are done on the primary or from the phone inventory page (the secondary tells you so). Tables, shifts and the drawer stay per till. Reports on the primary cover both tills; every receipt carries the name of the till that sold it.
27Move the license, new-version notice (2.2)
- New PC: Settings → Tests → License status → Release the license to move it to another PC. Activation ends on the old machine at once and a release code (RL-XXXX-XXXX-XXXX) appears. Send it to us with the new machine's code and you get the new key right away. If the old PC died and there is no release code, a transfer is done on a written declaration, once a year.
- New version: once a day, when a manager is signed in and “tell me when a newer version exists” is on (Settings → General), the program asks our server for the latest version and shows a one-time notice with what is new and a button to the download page. Nothing is downloaded or installed by itself, and selling never stops if the internet is down.
28Updates & portable ZIP (2.2)
- PosMasr-Setup.exe is the normal way to install (section 1). Updating: run the new Setup over the old one; it closes the till, replaces the files and keeps your data in
C:\ProgramData\PosMasr\data. Uninstalling from Windows removes the program only, never the data. - Portable ZIP (USB stick, no admin rights): extract the PosMasr folder to a permanent folder such as
C:\PosMasr— not inside Program Files — run Create Shortcut.cmd once (desktop shortcut, optional auto-start), and open the program; thedatafolder is created next to it. Never run it from inside the ZIP: Windows opens it from a temporary folder that is deleted on close, and your sales with it — the program warns you if that happens.
29Import from an old copy (2.3)
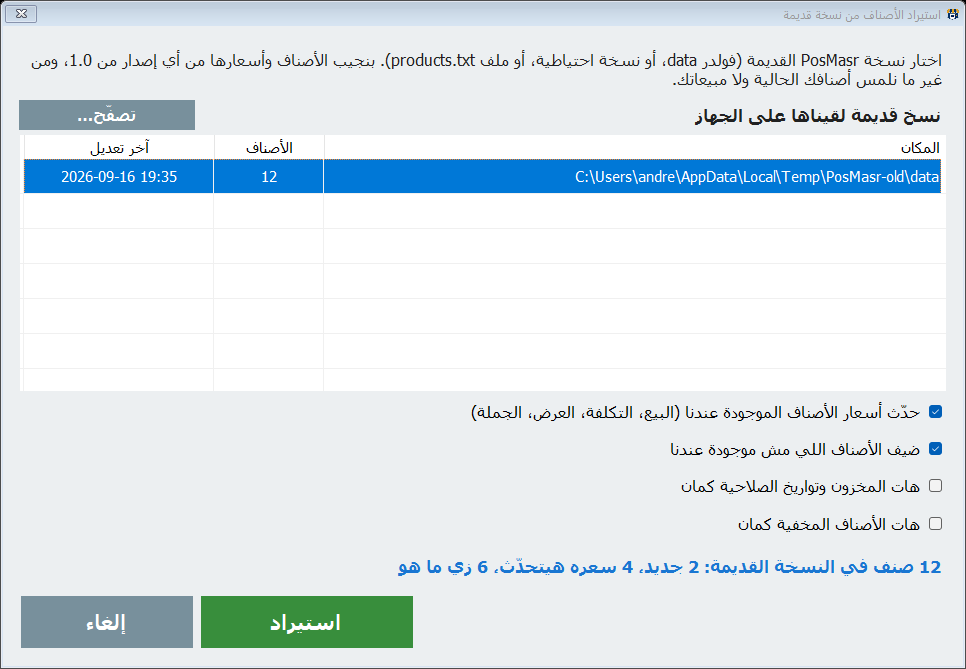
Installed the new version next to an older PosMasr (or CSG POS) copy where products and prices were added meanwhile? Bring them over instead of typing them again.
- Where: Settings → Products → Import from an old copy. The window lists every old copy it finds on the PC by itself (the usual folders on every drive, both program names under ProgramData, the desktop, documents, downloads, and their backups) with the number of products and the last change. Not listed? Browse… and pick the old copy's
products.txt(inside itsdatafolder). - What comes over: any version since 1.0. A product that already exists (same barcode, or the same name; a variant by its master and label) gets its prices updated (sell, cost, sale, wholesale) and any blank field filled (barcode, description, add-ons, unit, tax code, picture). A product you don't have is added with its category. Two more options, off by default: bring stock and expiry dates, and include hidden products.
- Before you press Import the line at the bottom tells you exactly what will happen: how many new, how many price updates, how many unchanged — and nothing else is touched: your categories, cashiers, settings and sales history stay as they are. The old copy is only read, never modified.
30Keyboard shortcuts (3.0)
Most tills have no mouse — so the whole program works from the keyboard. On any screen press F1 (or the ? button) for the list of that screen's keys, and every button shows its key in small muted text in its corner. The barcode scanner keeps working as before: it types the code and sends Enter.
Sales screen:
- F2 jump to the search / barcode box · F3 pay cash · F4 card · F5 on credit.
- F6 hold the cart on a table (with an empty cart: the tables list) · F7 discount · F8 returns (opens the receipts list in Reports) — each when its feature is on.
- F9 reports · F10 settings · F11 reprint last · F12 open the drawer · Ctrl+L switch cashier · Ctrl+K kitchen screen.
- In the cart: ↑ ↓ move between the lines, + / − quantity ±1, * then a number = type the quantity, Delete removes the line, Esc clears the whole cart (it asks first).
- Enter with the search box empty = pay cash (with a code typed: add the item) · PgUp / PgDn (or Ctrl+← / Ctrl+→) previous / next category.
The other screens:
- Login: ↑ ↓ pick the cashier, Enter goes to the password then signs in. Number pad and messages: digits, Backspace, Enter = OK / yes, Esc = cancel / no.
- Reports: Ctrl+1…6 the tabs, Ctrl+P print the selected receipt, Ctrl+E export CSV, F8 return. Inventory: Ctrl+F the scan box, Enter opens the row, Ctrl+R receive stock, Ctrl+1…3 the tabs.
- Credit accounts: Enter statement, Ctrl+M record a payment, Ctrl+P print the balances, Ctrl+N new customer. Suppliers & clients: Ctrl+N add, Enter opens the row, Ctrl+1 / Ctrl+2 the tabs. Stock-take: Ctrl+F the scan box, Enter count the selected item, Ctrl+P print.
- Kitchen screen: 1…9 or ↑ ↓ pick an order (← → jump between the columns), Enter moves it on: start → ready → picked up. Esc closes any screen.
31Managing products: categories, filter, bulk actions (3.0)
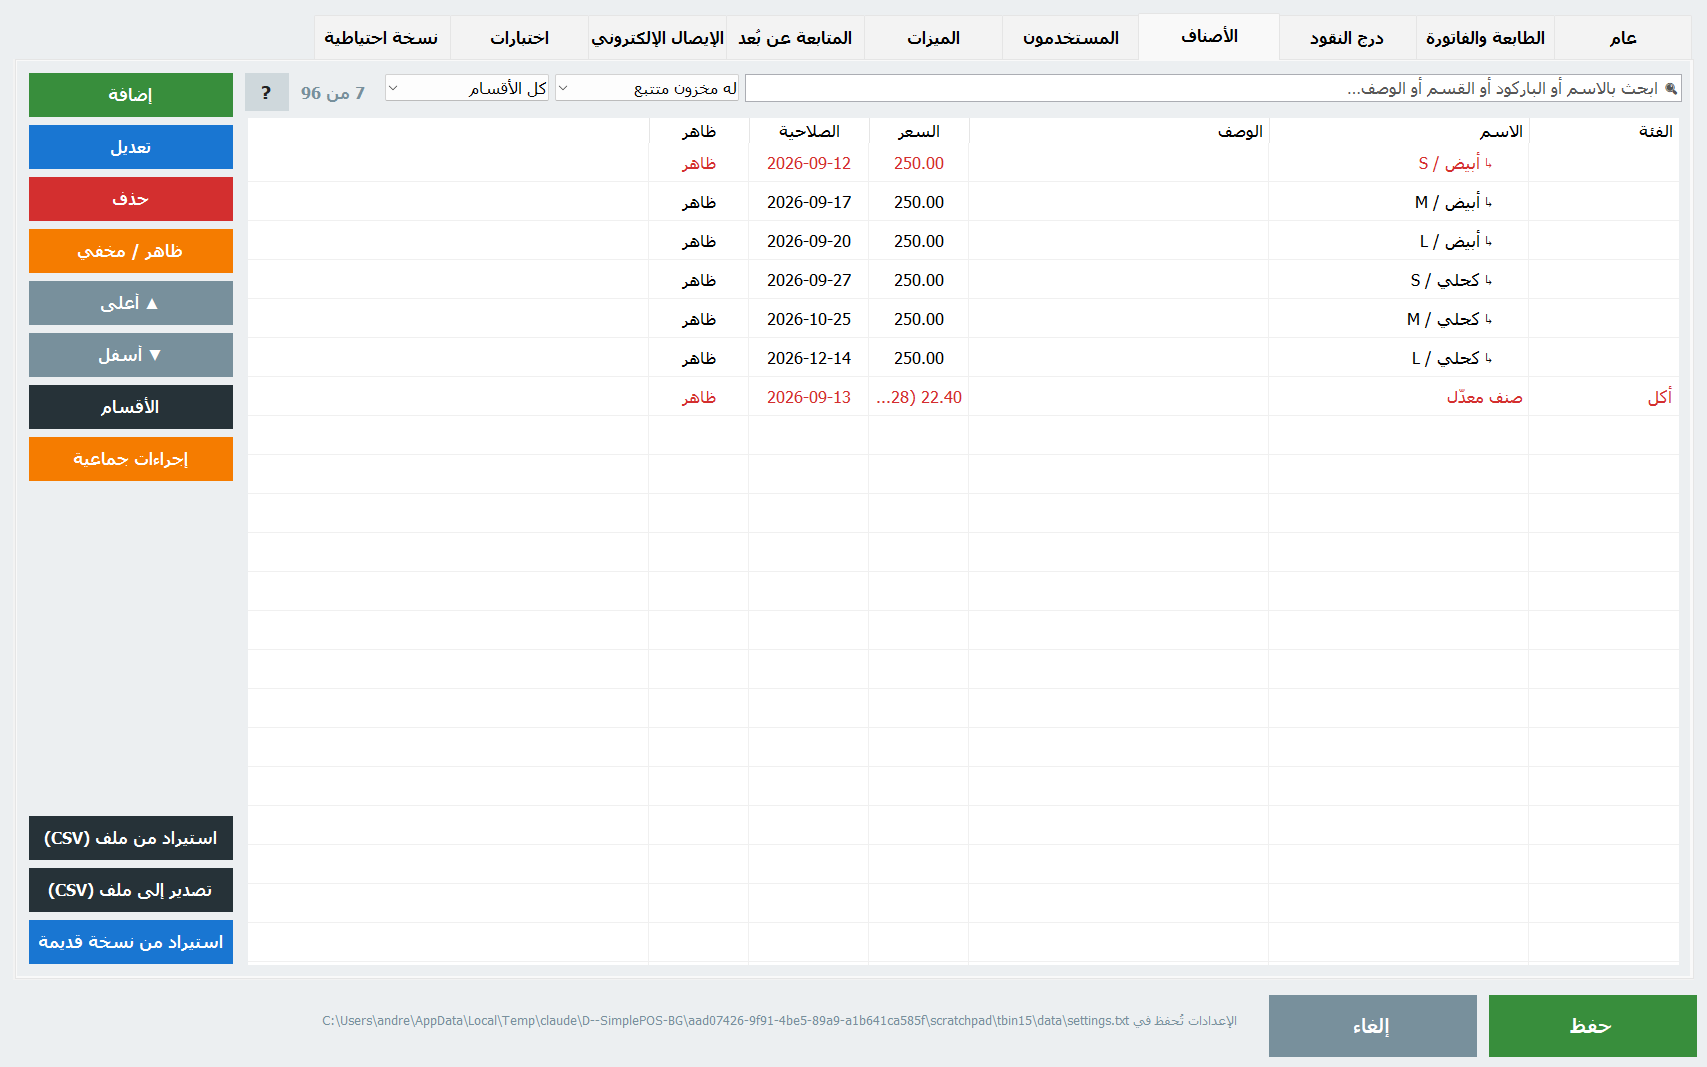
A few hundred products? The Products tab (Settings → Products) now has a search box and a filter above the list, a categories dialog, multi-select with bulk actions, and it refuses a second product with the same barcode or name.
- Search & filter: type in the box and the list narrows as you type (name, barcode, category, description). The drop-down next to it filters: no barcode, no price, no cost, hidden / visible, tracked stock, low stock, expiring, no picture, variants only, duplicate barcode / duplicate name — and a second drop-down picks one category. The header shows N of M.
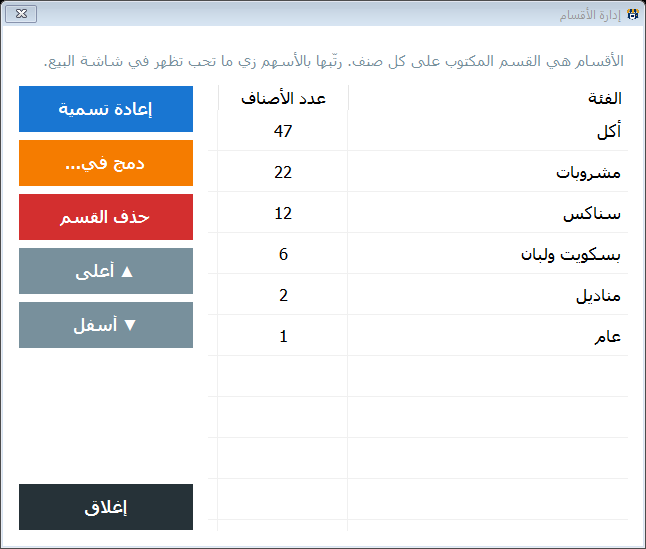
Escclears everything. - Categories button: every category with its product count. Rename (every product in it follows; a built-in name like Beverages keeps its translation, or type any name of your own), Merge into… another category (the old one disappears), Delete (its products move to General or a category you pick) and ▲ / ▼ to order them the way the sales screen shows them.
- Bulk actions: select several rows (Ctrl or Shift with the click,
Ctrl+Afor all) and press Bulk actions: move to a category, show / hide, needs cooking on / off, change the price by ± % or ± amount rounded to 0.25 / 0.5 / 1 (an example line shows the result before you apply), wholesale price = retail ± % (when price levels are on), and delete. Every action asks with the count and saves once. Variants follow their master. - No duplicates: saving a product whose barcode is already on another product, or whose name matches another one (ignoring case, spaces and diacritics), is refused — the message names the other product and offers to open it. Excel import and the old-copy importer skip such rows and list them instead of silently creating a second product. Use the duplicate barcode / duplicate name filter once to clean older data with the bulk delete.
- Keyboard:
Ctrl+Fsearch box,Escclear,Enteropen the selected product,Deletedelete,Ctrl+Aselect all,Ctrl+Nnew product. The ? button next to the search box lists them.